Saturday, 23 November 2019

Miffy Pyjamas


This is a make which turned out better than expected and that I like more and more every time I look at it - Miffy pyjamas! This isn't typcially a fabric that I would sew with which is why it's so nice to have the opportunity to experiment with different fabrics from time to time. I tend to stick to plain fabrics or more geometrical prints but Craft Cotton Co asked me if I could make them a sample out of their lovely new Miffy Jersey fabric and to me it was just perfect for a pair of pyjamas. It's a really good weight too and of course the print is really cute, so perfect for something comfy. 


There are two parts to the set that I made, a top and trousers. One of the great things about it is that they can be worn interchangably, I really like that added versatility. For the trousers I of course used my beloved Anima Pants sewing pattern - my fourth pair! This is the first time I've used it for pyjamas, previous versions (here, here and -my latest favourite pair- here) are all jogging trousers.


Because the jersey isn't too lightweight it was perfect for jogging trousers. As usual, the waistband was midly horrific to sew but I am getting used to the amount of arm strength needed! I finished these off with a drawstring made from the same fabric which is knotted at the end. I think it's perfect for pyjamas as opposed to cord which makes them more for day wear.


For the top I went for a Linden - of course! This is the second view which I have made twice previously (here and here) and although those were my first few Lindens I hadn't made that view since. It's perfect for a simply pyjama top though and fits really well.


After a very exciting trip to a trade show in Houston the pyjamas were kindly sent back to me and I can't wait to wear them! I'm so happy to have had an excuse to make them, I really pleased with how they turned out.

Friday, 15 November 2019

Checked Anima Pants


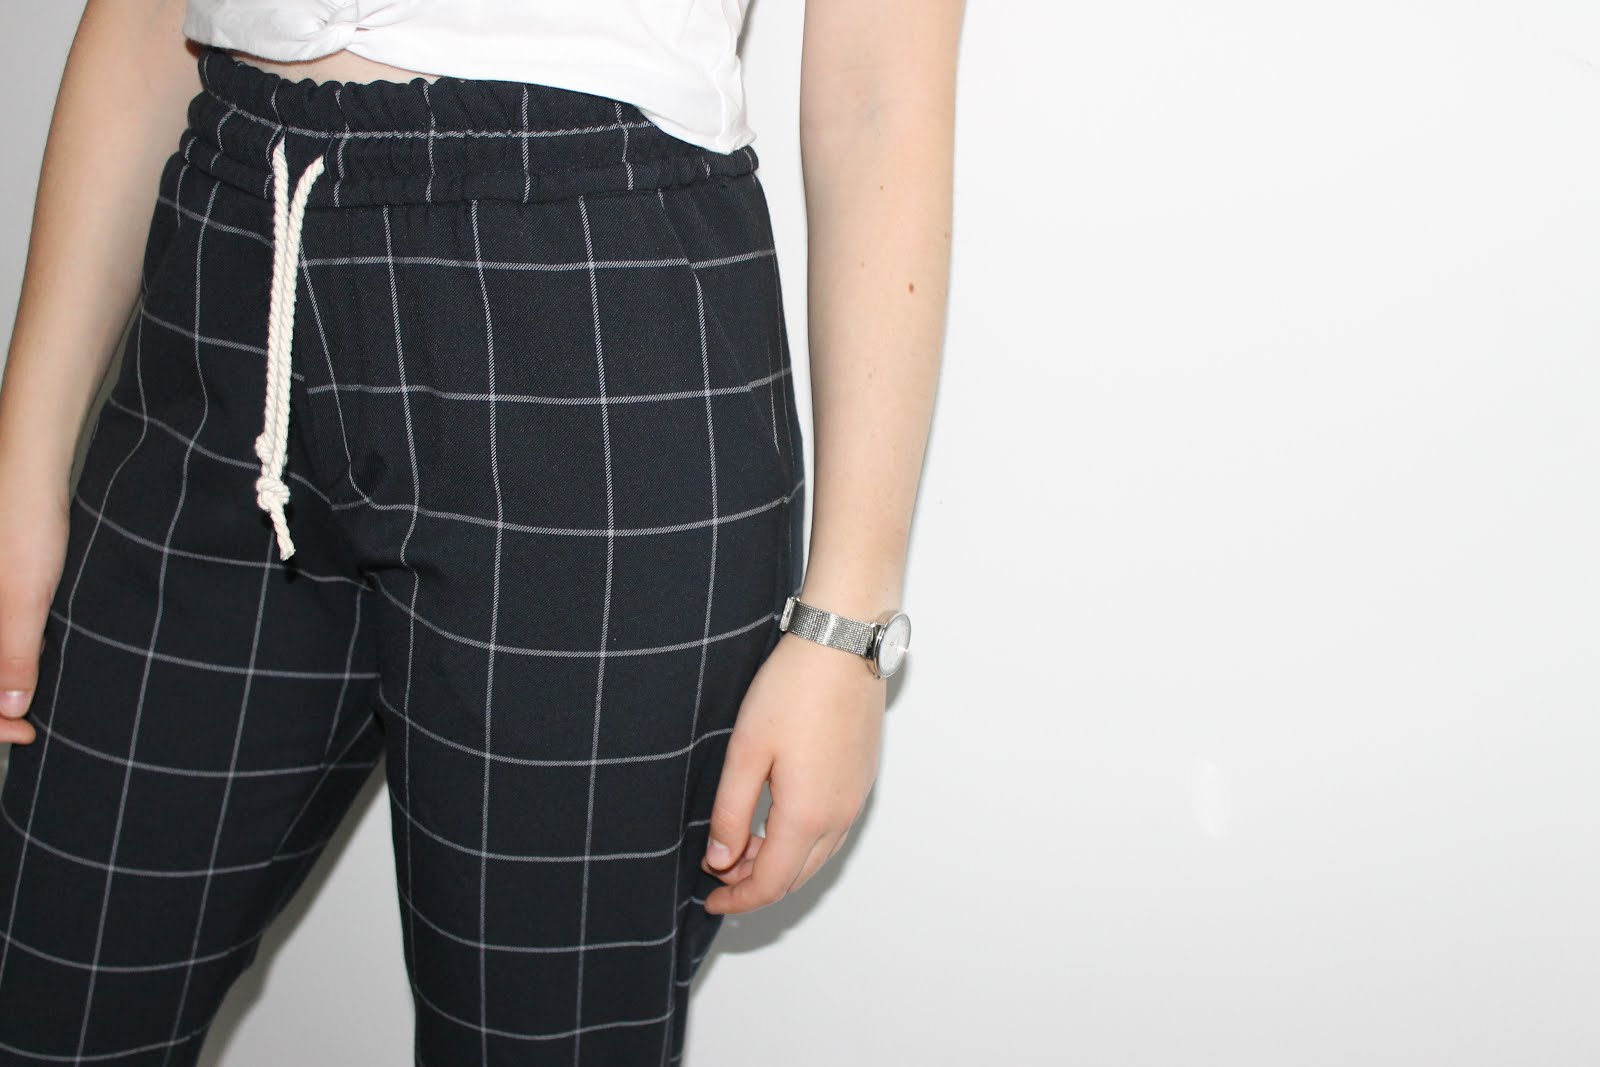
These trousers are my latest favourite make and possibly even my favourite make ever! Everything about them is exactly what I envisioned. My love of the Anima Pants sewing pattern by Papercut Patterns is by no means about to end soon. After a traditional pair of jogging trousers and a blue jersey pair I really wanted to make the pattern out of a non-knit fabric. I really like the current trend of jogging trousers made from non-traditional fabrics such as denim (or in my case some kind of wool blend) and I love the feeling of a make turning out just the way I hoped it would!


I think it's the combination of the fabric and pattern that has made these trousers so successful. I already knew the pattern to be a winner and I have wanted a pair of large-checked trousers for such a long time but the fabric proved impossible to find. I was so delighted to find this one! It was avaliable in black too which was intitially the colour I was looking for but decided that I actually liked the navy  more. As I mentioned this fabric is almost wool-like, although much thinner than an actual wool. It has a very slight stretch to it and the wrong side is really lovely and soft. I've just about mastered the waistband by now but it is still very time consuming and requires a surprising amount of strength to sew!


The only issue with checks is that they are a nightmare to pattern match! I wasn't too worried about perfect pattern matching but I was careful when cutting out the front pieces, especially the pockets. I thought the crotch would really annoy me as the angle of the folded fly meant it was impossible to pattern match, but I've realised that I don't actually notice it when I wear them and even when I do notice it I'm not really too bothered about it. Having said that I am really pleased with the pockets!


These trousers are hands down my new favourites. They're smarter than jersey joggers but super comfy thanks to the elastic waist and have been perfect for wearing to sixth form. For the tie, I chose a white cord and I'm really pleased with how that looks. I really wasn't happy with the tape I used on my other joggers and have since replaced the tape on my grey ones to the same cord as these. I tied a knot at the end and then left the ends in pva glue overnight which worked perfectly: they don't unravel at all and the glue is completely transparent when dry.

Thursday, 7 November 2019

Purple Linden Sweatshirt


I mentioned in my post about my grey linden that I had another planned and here it is! I bought this purple rib at the same time as the light grey one and although the grey was always going to be a linden, this one wasn't. However, I loved the grey linden so much that I decided to make another! I find tops like this perfect during colder months as they mean I can wear a t-shirt underneath so I knew that I'd get a lot of wear out of both of them.  


This shade of purple isn't usually the kind of colour that I buy, but I thought it was nice for a change and it's quite an unusual colour. It's a fairly heavy weight rib so perfect for a jumper. The only thing I changed between this and my previous linden was the neck hole - on this one I decided to make the sleeves slightly narrower at the top to have a smaller neck hole as I've found that with a really stretchy fabric it's easy to overstretch the neckband by cutting it too small. It also really annoys me when the neck hole is too big and shows the t-shirt being worn underneath so this seemed like an ideal solution. It worked pretty well but I think that it maybe wasn't ideal with the heavier weight rib as there is a slight bunching towards the top of the sleeves. However, this has softened over time so it might just be that it's very noticable to me!


The only thing I didn't foresee is that this rib is actually quite a bit heavier than the grey. I couldn't really tell initially as there isn't a big difference between the two. It feels more obvious when the top is actually being worn as it doesn't hang as well. I still really like it but the grey one has defintiely been worn more, probably due to a combination of a better weight fabric and a colour that is more me.

Monday, 28 October 2019

Palm Tree Shirt


I made this shirt such a long time ago that it feels somewhat strange to be writing about it now, especially considering how cold the weather currently is. One of the reasons it's taken me so long to actually photograph this shirt is to do with how long it was almost finished for. I rarely have half finished sewing projects but for some reason this shirt took me a very long time to add the finishing touches to. I spent a long time anguishing over the right buttons and because of this it was left on my mannequin for quite a while, completely finished other than buttons. The shade and size of navy that I wanted proved surprisingly difficult to find and so the shirt stayed buttonless for several months.


As summer approached it seemed like too much of a shame to leave the shirt unfinished and therefore unworn so I decided to add white buttons just so that it could be worn on holiday, with the intention replacing them if I found the right blue ones. Now the white ones are on I'm perfectly happy with how they look and I wish I'd just sewn them on sooner so that I could have started wearing the shirt earlier! I'm not sure why I was so against them in the first place...


I bought this fabric at the Knitting and Stitching Show at the same stand as this one and knew it would become a boxy shirt. I'd been vaguely looking for a fabric with drape to make a shirt for a while and I love the palm tree pattern on this one. I'm not entirely sure what type of fabric it is but it worked perfectly for this project although it did fray a lot! 


I made a pretty classic cropped boxy shirt which is something I've been wanting to try and make for a while. I'm really pleased with how the pattern turned out, especially having to draft the collar. It doesn't have any darts as I wanted it to hang loosely, which it does. My favourite detail is definitely the back yoke. I used the burrito method (which I've used twice before, here and here) and I love the beautiful finish it gives inside the shirt.

Tuesday, 22 October 2019

Re-fashioned Raindrop Top


As you might have noticed I really enjoy refashioning items of clothing. These are often clothes which I or other people in my family used to wear but no longer fit, or occasionally items I've found in a charity shop. However, as I've made more garments over the years I've started to get a better idea of what actually gets worn and which handmade clothes just aren't getting any wear. I find refashioning handmade clothes a tricky concept to balance I'm only just starting to come across having to get rid of handmade items as I haven't been sewing for all that long. Ultimately, I think it's best to refashion or give away something that isn't being worn, but I'm definitely keen to keep clothes that I made at the start of my sewing journey which are more special even if they aren't being worn any more.


Having a blog to document makes definitely helps when getting rid of them as it's really nice to have a record of something if I don't have it anymore. When it came to refashioning this top it was a fairly easy decision: I'm not as attached to it as some of my other makes and the fabric seemed too nice to waste. The original top that I made with this fabric was one that I liked a lot at the time but it was one of my very first ventures into pattern hacking and the final design could have been better. I'm happy to have made and enjoyed the original but as I was no longer wearing it I decided to hack it into a very simple t-shirt. I wanted to make something very basic so that the print didn't look too childish and a short sleeved t-shirt is always an appreciated addition to my wardrobe and so easy to sew.


I'm really pleased with how it turned out. It's such an easy make but what I love most about this top is how it shows how much my sewing has improved. The original had slightly wonky topstitching, was sewn without an overlocker and of course the shape didn't sit quite right. This one fits really well, is finished neatly on an overlocker and is a much easier style to wear.

Wednesday, 16 October 2019

Sewing for others: Chambray Skirt


My last minute holiday sewing didn't just stop at a dress for me, I also made my mum a skirt. Much like the dress this was quite a last minute decision once we realised how hot it was going to be and that lightweight clothes were needed. Sewing really comes into its own at this point as I was able to whip up exactly what my mum wanted without her having to spend time searching for a skirt which would inevitably be too expensive, not the right cut or made from the wrong fabric if found in a ready to wear shop. 


I've become pretty quick at creating patterns from existing items of clothing. Finding an item of clothing with exactly the right fit can be really difficult so I think that copying a ready to wear garment that you already own is one of the best uses of sewing. I managed to create the pattern for this skirt and sew it up in less than a day - I had a lovely sewing spree before going on holiday that included this skirt as well as my dress and this top, so I created a lot of patterns too! The great thing with this pattern is that I can now reuse it to make the same skirt again but in a different fabric if my mum wants another one. It's a really simple design with darts at the back to add shaping and an invisible zip in the side.


This skirt is a very simple design but has a some really lovely details. I added a double row of topstitching down the centre front as well as a row at the pockets and even though it's done in a matching colour I really like the texture that the topstitch weight thread adds. My favourite part of this skirt is defintiely the bias-binding. It was my mum's idea to bind the skirt in a contrast colour and I think it looks lovely, a secret detail as you can't see it when she wears it. It also gives the skirt a really neat, clean finish. 


Because the chambray is fairly lightweight I decided to line the skirt. However, as the whole reason for making it was to survive a heatwave, the lining only comes down partway so it wasn't too warm to wear. It worked really well, once again a detail which is practical but aso has the benefit of giving the skirt a nice finish. 
This skirt turned out to be a huge success, my mum has worn it so much over the summer and I'm really pleased to have a pattern so that I can make more if she would like another. 

Saturday, 5 October 2019

Navy Cardigan Top


When it comes to sewing plans, mine are a complete mix. Some projects I have planned for months and others are completely spur of the moment. I always find it refreshing to make something quick and easy after a more in depth project and it's nice to be able to make something that wasn't planned so that there's is no expectation about how it's going to turn out. I also really like being able to grab some fabric I have lying around and make something completely different when I don't have a sewing project on the go. 


This top was definitely a spontaneous make. I've seen a few cardigan style tops recently and wanted to have a go at drafting and sewing one. For most of this project I had absolutely no idea about how it was going to turn out and this was made possible through the fabric, a jersey that I bought for 2€ a metre from a market in Bordeaux! I bought a couple of others including the white one for this top at the same time and they are perfect for exactly this kind of project. The fabric actually feels really nice and I thought it would be absolutely perfect to use for wearable toiles when I'm drafting a design. Having the cheap fabric means I'm free to experiment as it doens't matter if the final garment actually works out.


This top is a pretty similar concept to my jersey shirt. I really like the look of buttons with jersey and although I love the design of the shirt I wanted to give a slightly different design a go. I used my much loved technique of sewing the buttons through both layers of fabric to avoid buttons holes on jersey which is such a great solution when sewing with stretchy fabric that can easily slip over your head. For the button band I actually used this tutorial on binding a neckband. I don't think I'd ever use this technique to bind a neckband but it was perfect for this top. I cut a long 3"strip and then followed the instructions to attatch it along the whole of the front of the top and the neckline. It worksd perfectly, the thickness makes the button band nice and stable and it's a really neat finish on the inside as well as the outside. The top is finished with a lettuce hem which is currently my favourite way of hemming jersey tops.


I  think these projects are my favourite kind: choosing inspiration from ready to wear and then trying to replicate it. It definitely helps to use a cheap fabric in case it all goes wrong but I've found that actually most things can be salvaged (to some extent!). Like my jersey shirts, I think that this will be a design that I make again in lots of different colours.