Monday 31 August 2020

Black Zip-up Hoodie


This zip-up hoodie is the kind of wardrobe staple that I wear over and over again. I think that it's easy to avoid making basic clothes when bright fabrics and interesting patterns are there to distract, but I really enjoy making something that I know will be worn again and again. That's not to say I don't enjoy sewing something a bit exciting from time to time though!


Last year, I bought myself a ready-to-wear grey zip-up hoodie. Since then, I've worn it again and again as a way of easily adding an extra layer. Instead of buying a second one, I wanted to try and make one. I chose to make a black one as, like grey, it's a colour that goes with a lot of clothes that I already own and can easily be worn as an outer layer. 


Plain fabrics get a bit of a bad reputation for being 'boring', especially when sewing. Obviously, a plain t-shirt isn't the most exciting of makes but with a design like a hoodie, there are so many surprising ways to add interest. With this hoodie, instead of using the same fabric for the entire thing I've added in ribbing for the cuffs and hem-band as well as tape for the drawstrings. The zip and metal disk also add extra detail, meaning that there are several different textures. I did consider adding a patch to add a bit more colour but decided to keep it simple as I'm not actually trying to make the most interesting hoodie in the world, just a hoodie that I know I'll wear a lot!


When making something simple, I think the most important thing is to use the right fabric. I used this black French Terry fabric from Fabrics for All which is the perfect weight for a hoodie. It's thick enough to add warmth and hold the shape of the hoodie without being bulky. The fabric also feels so nice and has retained its colour well after being pre-washed. But if I was going to give this fabric an award, it would be for how lovely the wrong side of the fabric is! There's nothing worse than a fabric that looks nice on the outside but feels horrible to wear next to the skin. Not only is the wrong side nice and soft, it also looks nice which is so important for this make as I'll be wearing it unzipped most of the time and the inside will be visible.


As strange as it sounds, I think that the cuffs might be my favourite part of this make! One of the main ways in which shop-bought and homemade clothes differ is in having notions that perfectly match the fabric. It's easy to buy a top with a matching zip but much harder to buy a zip in the exact colour of your fabric. This is the same for ribbing. In the past, I've tended to just use the same fabric for the cuffs and hem band of a jumper but I've always wanted to use a matching rib to make it look a bit more professional. I really wanted my hoodie to have this professional feel, and so I ordered this black rib from Fabrics for All to go with the French Terry. I'm so pleased with how it looks - the two fabrics match perfectly! 


There is one final touch that I added to complete this make - a metallic disk. This is something that I completely copied from the RTW hoodie that I already own. I love it when high-street shops add little details like this and also love adding them to my makes. This is a plain silver disk that I sewed on near the side seam, a really quick addition which makes me smile every time I see it.


I wasn't expecting to feel so proud of this make but in really taking my time over the details (especially the topstitching!) I've made something that I really like. It doesn't take a lot to turn a make from something boring into something a lot more special. Knowing that I was going to wear this a lot also made the sewing process a lot more enjoyable as it provided a reason for taking my time over small details.

This fabric was gifted to me by Fabrics for All as part of their blogging team, but all thoughts and opinions are my own.

Friday 21 August 2020

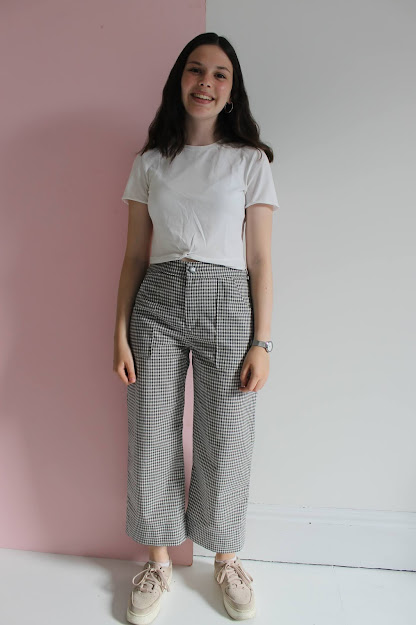
Gingham True Bias Lander Pants


Making these trousers was pretty much inevitable. Ever since making my first pair of Lander Pants, I've been wanting to make myself some more. I've also wanted to make another pair of gingham trousers as these ones no longer fit and there was a gingham-trouser gap in my wardrobe! However, I wasn't planning on making a pair of gingham Lander Pants, partly because most of the gingham trousers I've seen are narrow-legged. I also wasn't actively on the lookout for gingham but when I saw this lovely grey checked fabric I immediately wanted to buy it and make a pair of Landers out of it - and so the gingham Lander Pants were born!


My love of the True Bias Lander Pants pattern will never end. After finally making a pair in January out of black denim I realised that this was the dream trouser pattern for me - it's the only trouser pattern with a waistband that actually fits me with minimal alterations. I also love the style of the Landers and whilst the black pair were a little out of my comfort zone when I made them, I have enjoyed wearing them so much. In making a second pair I've also discovered the versatility of the pattern - I'm not sure you could tell that the two pairs are made from the same pattern! In changing the pattern, colour and weight of the fabric, as well as the fly closure, the two pairs of trousers feel so different.


I made my first pair of Landers in black denim to get a really classic look (which I love) which is then contrasted by the exposed button-fly. The majority of the Lander Pants that I've seen are made from plain denim, it's the most obvious fabric to use and it works really well. But what I didn't account for was how well the pattern would work in a lighter weight fabric. 
I picked up this grey gingham at 'Le Marché Saint-Pierre' in Paris. If you've ever been, you'll know it's a kind of crazy fabric super-store with 4 or 5 floors, each floor has a different type of fabric on it. Considering the fact that the shop is a bit haphazard, they actually have a surprisingly good website! I've been there a few times and while it isn't the calmest fabric shopping experience (I'd recommend Frou-Frou a few doors down for that!) they do have a lot of really great fabric. This gingham fabric was actually a 3m coupon - I usually avoid coupons as I never need that much fabric but I loved the gingham so much, and at €12 for 3m there really wasn't much to complain about!
I think I have a pretty good track record with that fabric shop now as not only do I love my new gingham trousers, but the fabrics that I bought there years ago were also made into successful garments. Last time I bought two needlecords, one to make a burgundy Delphine Skirt and one to make a burnt-orange Cleo. I don't wear the Cleo anymore but I did wear it lots when I was younger, and after shortening the Delphine skirt and adding trapezium patch-pockets I still wear that one lots during the summer.


Because the fabric was a coupon I have no idea what the content of it is, but it feels like it's a really nice quality. It's slightly heavier than a cotton but lighter weight than a twill or canvas. At any rate, it's the perfect weight to hold the structure of the Landers and was really easy to press flat. The size of the gingham squares meant that I didn't worry too much about pattern matching but I did try my best for the waistband, fly and pockets. The waistband and fly turned out pretty well, the pockets slightly less as they weren't actually cut straight so pattern matching the entire pocket was impossible!


Like I said, I had no intention of making a pair of gingham Lander Pants. It seemed to me like the majority of gingham trousers are cigarette-pant style and that a wide-leg would look slightly strange in gingham. I'm really not sure what made me think that, but there we go! I do still think that a traditional black-and-white gingham would look best as a narrow-legged pair of trousers but the fabric that I bought feels very different to a gingham like this one. I think it's a combination of the weight, colour and size of the squares that just screamed 'Lander Pants' to me when I saw the fabric and I'm so glad I went with this as I think the fabric and pattern were just perfect together. Because so many gingham fabrics are light cotton it's really nice to have found this one, somehow it feels a bit more grown-up. I also love the shade of grey, again I think it's a combination of the colour and size of the gingham that makes the fabric work so well.


Although I do technically have a pair of gingham trousers now, these weren't what I had in mind when I wanted to make another pair to replace these ones. Of course, this just gives me another excuse to make some more! I really loved these gingham trousers that I made a few years ago but they don't fit me anymore (I made the legs too short). I also didn't choose the best pattern, so I'm looking forward to making another pair of black-and-white gingham trousers which fit much better.
This also will definitely not be the last of the Lander Pants! In making these I've been reminded once again of how much I love the pattern.


I like the style of this pattern a lot, but that's not the main reason why I like it. I mainly like it because it fits me so well. I have long since given up on finding a trouser pattern which fits me perfectly (to be honest, I'm not sure anyone has a pattern that fits without any adjustments) but the Landers fit me by far the best. For me, the problem with trouser fitting is two-fold: I have a sway-back and a large difference between my hips and my waist measurements. This means that with any pair of trousers or a skirt with a waistband, I either can't get the garment over my hips or it bags massively at the waist. Obviously, neither is ideal! I've managed to confront this a fair bit thanks to making my own clothes, but on nearly all patterns I have to take out a wedge of fabric at the centre back seam and at the side-seams on the waistband. It works, but often leaves a bit of excess fabric that bunches up at the centre-back (this happened with this skirt). With the Lander Pants, I found that I didn't have to take any fabric out at the centre back seam, all I needed to do was take a wedge out of the side seams starting at 2.5cm at the top and sewing diagonally to join up with the normal seam allowance at around the base of the pocket. It's amazing! Because the adjustment is made to the side seams you can't see it at all.


I did still have to take a further 4cm out of the waistband on either side (again using a triangle-shaped tapering method) but it's really a minimal adjustment compared to what I've had to do with trouser patterns in the past. Also, this is where the beauty of using a light-weight fabric came in: I made this same adjustment to the waistband on my black denim pair of Landers but the bulk that the denim caused puts me off wearing a top that doesn't cover the waistband with them. With the gingham, the darts that I created pressed perfectly and didn't create any excess bulk.
I love the shaping that the back darts create with this pattern. Just like with my last pair, I omitted the back pockets as I really don't like the shape of the square pockets that come with the pattern.


Onto the most obvious change that I made to the pattern - I added a fly zip! The exposed button-fly is one of the main selling points of the Landers and I love how it looks with the plain black fabric. Obviously, that wouldn't have had the same effect with a busy gingham! I could have still done an exposed button-fly with these and just used matching buttons but I think it would have looked way too busy. Also, I just prefer zip-flies in general. I knew from the start that the gingham fabric would need a zip fly which probably would have led most people to choose a different pattern, but I wanted to make the Landers for their fit and also the style of the pockets and legs. I've sewn a lot of zip-flies before so felt pretty confident in changing the button-fly to a zip-fly (although without instructions and with a pattern drafted for a button-fly that could have been a disaster!). True Bias has actually released a zip expansion pack for the Landers with actual pattern pieces and instructions, but I was able to do it without any additional pattern pieces and for free so I'm not sure how much it adds.
I'm so happy that the fly worked so well, I'm really proud of how neat it is. If I do the zip-fly hack again I'll definitely add on a left fly extension like the Closet Core Patterns Ginger Jeans have - I followed their tutorial for these trousers but my zip isn't set as far in as I'd like it to be because I didn't use a pattern that matched the instructions. It still worked though, so I'm counting this as a big success!


I loved these so much from the minute I finished them and wore them the day after! They are the best fitting pair of trousers that I have ever owned, I actually can't quite believe how comfy they are. I think that's partly to do with making the pattern out of a less rigid fabric. These trousers feel so 'me' and I know I'm going to wear them lots. 


Also, this white t-shirt continues to be one of my most worn makes ever! I basically wear it with every pair of trousers that I own and I love it. I desperately need to make a replacement though because the fabric was horribly cheap and it's pretty much falling apart!

Saturday 8 August 2020

Handmade top with v-notch neck


A few weeks ago I found myself in a bit of a sewing slump. I really wanted to do some sewing but felt like I really didn't need to be making any more clothes and so didn't feel motivated to start a new project. Of course, I probably don't need to sew any more clothes, but sewing is my hobby and it's really important for me to have a sewing project on the go.
As is often the case, this sewing indecision was due to me completely overthinking what I was going to make out of the fabric! I loved this floral fabric the moment I saw it and always planned to make it into a simple t-shirt. However, I really didn't want to make another basic top. Not so much because I have a lot of them (which I do!) but because I wanted a slightly more challenging sewing project. 


The situation somehow magically solved itself with a bit of RTW inspiration. I was looking at some online shops and saw a top with a v-notch neck detail, which I thought would be the perfect detail for a top made out of the floral fabric. It makes the t-shirt a bit more interesting but still lets the fabric do the talking! 
Making simple tops with extra details have always been some of my favourite things to sew. These tops allow me to learn new techniques like ruching or plackets while making something that I know I'll wear. Other ways I've made simple tops a bit more interesting have been to add a patch, a ruffle, buttons and even a zip. I guess I'll be adding a v-notch neck to that list next time!


Once I'd decided on adding in a v-notch neck I (naturally) wanted to make the top straight away. I looked online to see if there were any tutorials for making a v-notch neck but couldn't find anything, so I made up my own technique. I might create my own step-by-step tutorial as it was actually pretty easy to do once I figured out the technique and it's a nice detail that you can add to any jersey top pattern.
The most important thing for me was to keep the neckline really neat, especially at the base of the v where messy stitches would have stood out. I'm really happy with how neat the v-notch is, although such a busy print would be quite forgiving to any mistakes. 
This fabric (which I bought in Tokyo!) was so perfect for the collar as it's a fairly stiff jersey. At least I think it's a jersey, but it has basically no stretch - it just has the feel of a knit fabric. The stiff fabric holds up the collar really well and also made it a lot easier to sew the bias-binding onto, I definitely wouldn't enjoy sewing a v-notch collar onto a stretchy lightweight jersey!
Like I said, I made up my own technique for the collar which worked really well and ended up really neat. I spent quite a long time figuring it out and basically sat on the floor with a few fabric scraps, cutting and pinning a mini version to find out what would work!


The rest of the top is really simple, I used the same pattern I use every time I made a top like this one, which in it's simplest non-hacked form leads to a t-shirt like this stripy one. Because the v-notch is bias-bound for a neat finish, I added bias binding around the entire neckline instead of a neckband like I usually would add to a t-shrit. I wasn't expecting to like the bias-binding so much but I actually really do, I think it's down to the lack of stretch in the fabric that it worked so well.


This lovely top was exactly the kind of sewing project that I needed. It was fun and easy to make and I really enjoyed figuring out how to sew the collar. I'm so pleased to have made something so wearable out of the fabric as I love it so much but it's definitely a little out of my comfort zone! I can't believe that I've almost used all of my fabrics from Tokyo, after this top and my recent polo shirt I only have one more left!


And I love that v-notch detail so much!