Thursday 31 May 2018

A Second Stella Hoodie


It turns out that Higgs and Higgs textured knit fabrics are destined for Stella Hoodies! My Mum asked me to make her a Stella Hoodie out of the fabric that she bought when we went to Higgs and Higgs after seeing and liking mine. I love how quickly this pattern comes together so was perfectly happy to make her one. I wear my Stella constantly and I hope that it'll be a garment that my Mum gets a lot of wear out of too. As the weather has been warmer recently it probably isn't the most seasonally appropirate make, but knowing the current weather situation it could easily be hoodie weather tomorrow!


I joked here about how I had used the same fabric for all of my hood linings up until that point. Little did I know that I would be using the same fabric again next time I sewed a hood! This is fabric that I had left over from my Kelly Anorak lining (coincidentally also from Higgs and Higgs!) and luckily it matched the other fabric perfectly. I think that the only technical part of the Stella Hoodie is sewing the button holes onto stretch fabric. This fabric isn't that stretchy relative to many other jerseys but I still found that the fabric needed to be guided through my sewing machine in order to sew the button hole.


Like I said at the start, it was a really quick make. I was able to use my overlocker for the first time on a knit garment too, which made it even faster to sew - I loved it! The only downside to this fabric is that the inside of it is quite an opaque white which means that the sleeves can't be rolled up. Also, the fabric is quite stiff/scratchy inside rather than soft which is a shame as a soft cosy hoodie would be nicer to put on when it's cold. This definitely isn't a something that prohibits the wear of this fabric though, and it is wonderful fabric in every other sense.

Friday 25 May 2018

Honeycomb Shirt


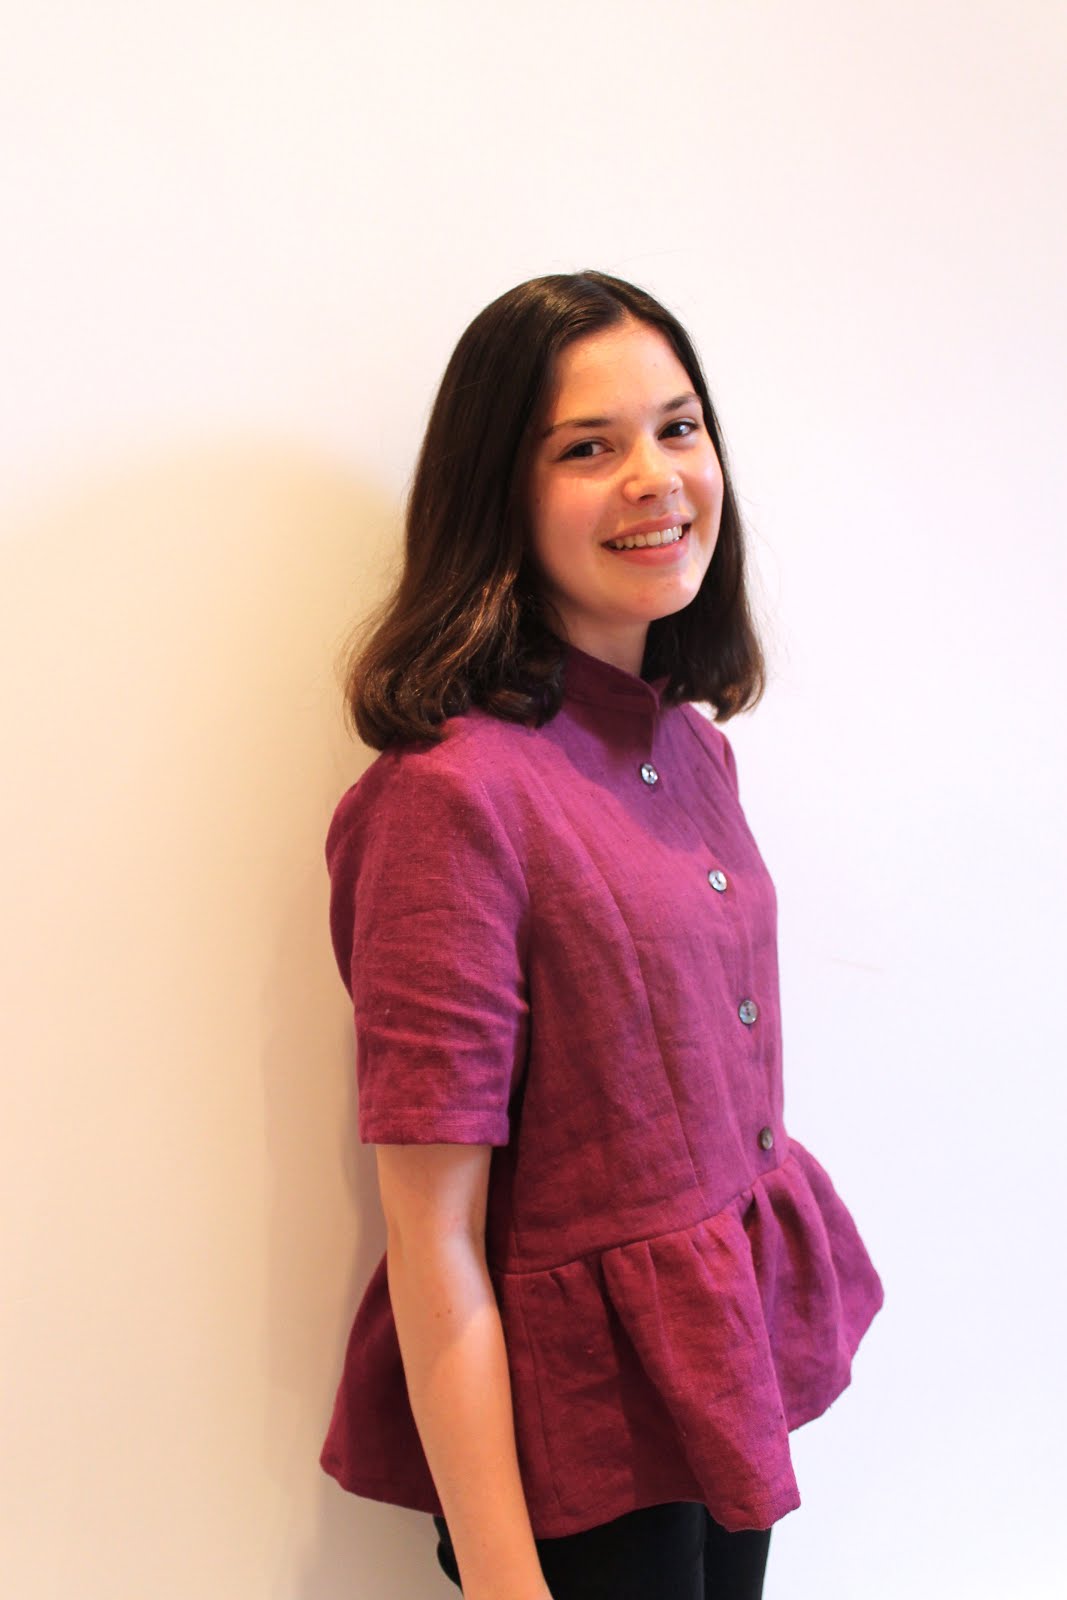
Very excitingly, I was a pattern tester for the new Coco Wawa Crafts sewing pattern: the Honeycomb shirt and shirtdress which launched a few weeks ago. The pattern has several variations but I decided to sew the shirt version which features a peplum and a mandarin collar. To be honest, I wasn't sure about the style of this shirt at first. It's not something that I usually would wear, so I'm really glad to have had the opportunity to test out a pattern that I otherwise probably wouldn't have sewn.
The only change I made to the pattern was to omit the bow ties which feature just above the peplum. I did this due to personal preference only, but it does mean that the waist is slightly boxier and less cinched in than it would be if there were ties. I quite like the loose boxy look, but it is something to bear in mind if you're making your own.


I sewed this shirt out of a purple linen fabric that I bought quite a while ago - in fact, I bought it at the same time as the fabric for this jacket! I love it when a pattern comes along that just matches a fabric that you already own, and this was definitely the case for me with the Honeycomb. Although it can be made from a variety of woven fabrics I'd say that it is destined to be paired with linen. It's actually the first time that I've ever sewn with linen, partly due to the cost of the fabric. It does feel wonderful to sew with though (despite being prone to both fraying and wrinkling!). I know that the wrinkling of linen is something that puts a lot of people off of sewing with it, but I actually really like the character that the wrinkles give to the fabric and in turn the garment as a whole. I haven't washed this top yet, but I did pre-wash the fabric which is a must with linen. I'm hoping it won't shrink too much when I do wash it...
What I absolutely love about this pattern are the gorgeous princess seams that run down the front bodice. I love the look that they give, the style lines are really lovely. I'd also like to experiment with hacking this pattern by using the top but not the peplum, as the bodice fits me really well. As a bonus, the princess seams mean that the top is really simple to fit too.


As I mentioned at the start, this shirt is a slight departure to my usual style, and I think that this is mainly due to the mandarin collar. It's still growing on me, but I really enjoyed testing out a new skill. Sewing a mandarin collar is so much easier than sewing a normal collar and the instructions were great, so don't let that put you off! I did sew mine using a slightly different method which is something I usually do with collar stands. Rather than sewing the outer collar stand to the neck and then topstitching form the right side hoping to catch the inner collar, I sewed the inner collar stand to the neckline right sides together and then sewed the outer collar down by topstitching around it. I hope that makes sense! I did this in order to make sure that the inner collar stand was definitely properly sewed down, as I often find that if you sew from the right side it's often hard to catch the part underneath in you stitching.
I think that the buttons are one of my favourite aspects of this top. Again, I had them already and was delighted to see that they match the purple linen so well! I took my time sewing the button stand, collar stand and buttonholes and I love this photo of the close-up details.


This top was definitely a bit of an experiment for me, both with the colour and the style. I do really like it though, and as I said it's nice to sometimes be pushed to sew things that one wouldn't usually sew. I'd love to make more of these tops, a blakc viscose one is definitely on my list of things to make. On my next version I think I might size down too, or at least sew with a slightly larger seam allowance, but then again a drapier fabric would probably make it look less boxy anyway.

Saturday 19 May 2018

New Pyjamas


Pyjamas are currently my favourite thing to sew for others. Although I enjoy making clothes for other people, it's always quite stressful especially when they're hoping to wear it. The good thing about sewing pyjamas is that the person who receives/person who makes them them doesn't have to worry about weather or not they're perfect because no-one will see them! I've made my sister in particular quite a few pairs of pyjamas over the past few years. For this summer she asked for another pair of pyjama shorts. I made her a pair of pyjama shorts last year which have received a lot of wear, although they may be too small soon. Hopefully these will be able to last her a few more years! I used the Tilly and the Buttons Margot Pyjamas pattern to make these which I shortened to make a pair of shorts (the same pattern that I used for these pyjamas, which I happen to still love!).


The fabric for these was actually bought at the end of last summer. I do have a good excuse for taking so long to actually sew these though, in that it has been the complete opposite of pyjama shorts weather for the past however many months. As soon as the weather warmed up these were top of my sewing list, and were a really quick and easy make. You may recognise the fabric from here, it was bought from Stoff and Stil which has the most incredible range of knit fabrics. This one is such good quality, so I'm very pleased to have enough left to make a top for myself! I'm currently thinking of the Frankie T-Shirt from Stretch!, but I haven't quite decided yet...
Because the fabric is such good quality and because it was a make for someone else, I took my time with the small details on these. I often think that pyjamas are something that can easily be rushed due to the thought 'oh no-one will see them' but because I made them for my sister I felt the need to be more careful, and I'm so pleased I was because it means that they'll last longer and hopefully she will love them that bit more! Some of the extra touches include a double row of topstitching around the waistband and carefully measured double hem.


There isn't really much else to say about these pyjama shorts, other than they have already be worn and washed several times, which I would class as a success! I'm sure I'll be making more pairs of pyjamas for my sister in the future as we know that this pattern fits her well and that she likes the style. I really enjoy making quick and easy projects from time to time, and as I mentioned at the start pyjamas are a great not too stressful thing to make for someone else. Of course, the bad part of sewing for other people is having to give it away at the end, I am quite jealous as I really love these!

Monday 14 May 2018

Overlocker Unlocked - An Introduction


So... an introduction. I don't know about you, but an overlocker has always been one of those things that I've dreamed of owning (dreamed, not thought, being the key word in this sentence). Ever since I started sewing, to me an overlocker meant buisness; it meant being professional and it meant knowing exactly what you're doing. But here's the thing: it doesn't have to. For a long time I always thought of an overlocker as being something that it would be  ridiculous to invest in if I hadn't achieved a certain level of sewing. And while this is true in a way, skill level is definitely not the only way to measure wether or not it's time to get an overlocker.

I'll touch upon this more later but in my opinion, the investment of an overlocker is more to do with how much you love sewing than anything else. While overlockers really are quite an investment, I cannot emphasize enough how much you can get out of of one if you love to sew.

Still though, overlockers remain to most people a confusing and technical piece of equiptment at the very least (I certainly had no clue what I was doing when I first took it out the box!) and so I've decided to start a series all about how to get the most out of an overlocker. In other words, I'm hoping to unlock the confusion surrounding them and enable you to know wether or not investing in an overlocker is a good step forward in your sewing journey.

Some of the things that I'm hoping to cover in the next few months include:
  • Getting started
  • Threading the machine
  • Overlocking woven/stretch fabrics
  • Tips and tricks for using an overlocker
  • And hopefully lots more!

I hope that you find this useful, let me know if there is anything in particular that you would like me to cover in this series. More than anything it will be a way to document my journey learning how to use an overlocker. At the beginning, I'll start off having never sewn with an overlocker before and I'm hoping that by the end even changing the threads will come naturally... we will have to wait and see!

Sunday 6 May 2018

Cropped Stella Hoodie (a.k.a the perfect top)


Sometimes, you sew a garment and the immediately wonder what you used to wear before it. My Tilly and the Buttons Stella Hoodie is exactly that kind of garment. Since making it, it's all I've wanted to wear! The Stella Hoodie is one of the patterns in Stretch!, a really easy to sew hoodie with drop shoulder sleeves and a lined hood. There are also options to make it either sleeveless or as a hoodie-dress, both things that I absolutley want to try! A hoodie is the kind of thing that I wear a lot during the colder months and although we're coming into spring it's definitely still something that will wear a lot. 


Since receiving the book I've made quite a few of the projects, and although the Stella Hoodie caught my eye from the start there were a few changes that I wanted to make to my first version. As you can see, I decided to crop the hoodie to be able to wear it with high waisted trousers and skirts; I also think it makes it look a bit more sophisticated. I'm so pleased about this, I think it works perfectly, and a cropped jumper is definitely something that I'd been lacking which is one of the reasons that this top has had so much wear! I did leave the cuffs off the end of the sleeves, mainly because I didn't buy any ribbing and the cable knit would have been too thick to fold over double. I did consider ordering some ribbing, but I actually really like the sleeves like this and if needs be I can always buy some in the future.


The first time I sewed a hood was in my Kelly Anorak, and I was pleasantly suprised at how easy it was. Obviously, this pattern is at the other end of the spectrum in terms of difficulty to the Kelly, so this hood was even simpler to sew! One of my favourite aspects of the pattern is that the hood is lined, the perfect excuse for a lovely bit of contrast fabric. Funnily enough I've actually used the same fabric to line this hood that I used to line the hood of my Kelly Anorak, just in a different colour way. I chose to buy 1/2 metre of the stripy fabric at the last minute in the fabric shop and I am so glad I did! I probably would have otherewise used my leftovers of the blue stripe to line the hood, but I absolutely love the pink and grey together. It's discreet enough to allow the jumper to be worn easily but still adds a really nice extra touch. 
The fabric is a gorgeous grey cable knit that I bought when I visited Higgs & Higgs, the perfect kind of fabric to sew a jumper in. I really love fabrics that have texture to them, so this one is definitely my cup of tea. 


You may have noticed the lack of cords around the neck of my hoodie - let's just say that they are a work in progress! I haven't found any cord that I like so far, I'm searching for a pale pink tape rather than some round cord which I wasn't ever expecting to be easy to find, so for now I'm just wearing it without. To be honest, it doesn't bother me at all. I have sewn the button holes for the tape to come through and if I see some I'll buy some, but that might be next week or in a few years! I was a little worried about sewing button holes on knit fabric but it wasn't actually a problem at all. It defnititly helped to interface the fabric though, and I wouldn't like to try sewing button holes onto a stretchier jersey...