I've always enjoyed the in-depth sewing process of making a pair of jeans. Not only are they enjoyable to make as the sewing involves more thought than a simple top, being able to wear a pair of handmade jeans is an amazing feeling. As my sewing skills and confidence has increased I've started to hack sewing patterns into different styles but I've previously steered away from hacking jeans patterns. The fitting is more complicated on jeans, and I worried that I wouldn't get the proportions right. Now that I've made quite a few pairs of jeans I feel more comfortable with the fitting and sewing process and after the success of my flared jeans hack I thought I'd venture further jeans hacks.
The
Megan Nielsen Dawn Jeans is a great pattern for non-stretch jeans, I made my
first pair out of corduroy last year and have recently
made a wide-legged pair. I especially like how high-waisted they are, making them comfortable to wear. Having made two pairs previously I've managed to alter the back pieces to get the pattern to fit me perfectly at the waist, so it seemed like a good pattern to use as a base for future jeans hacks. With three different views, the pattern also has a variety of different leg-widths which provide a great starting point.
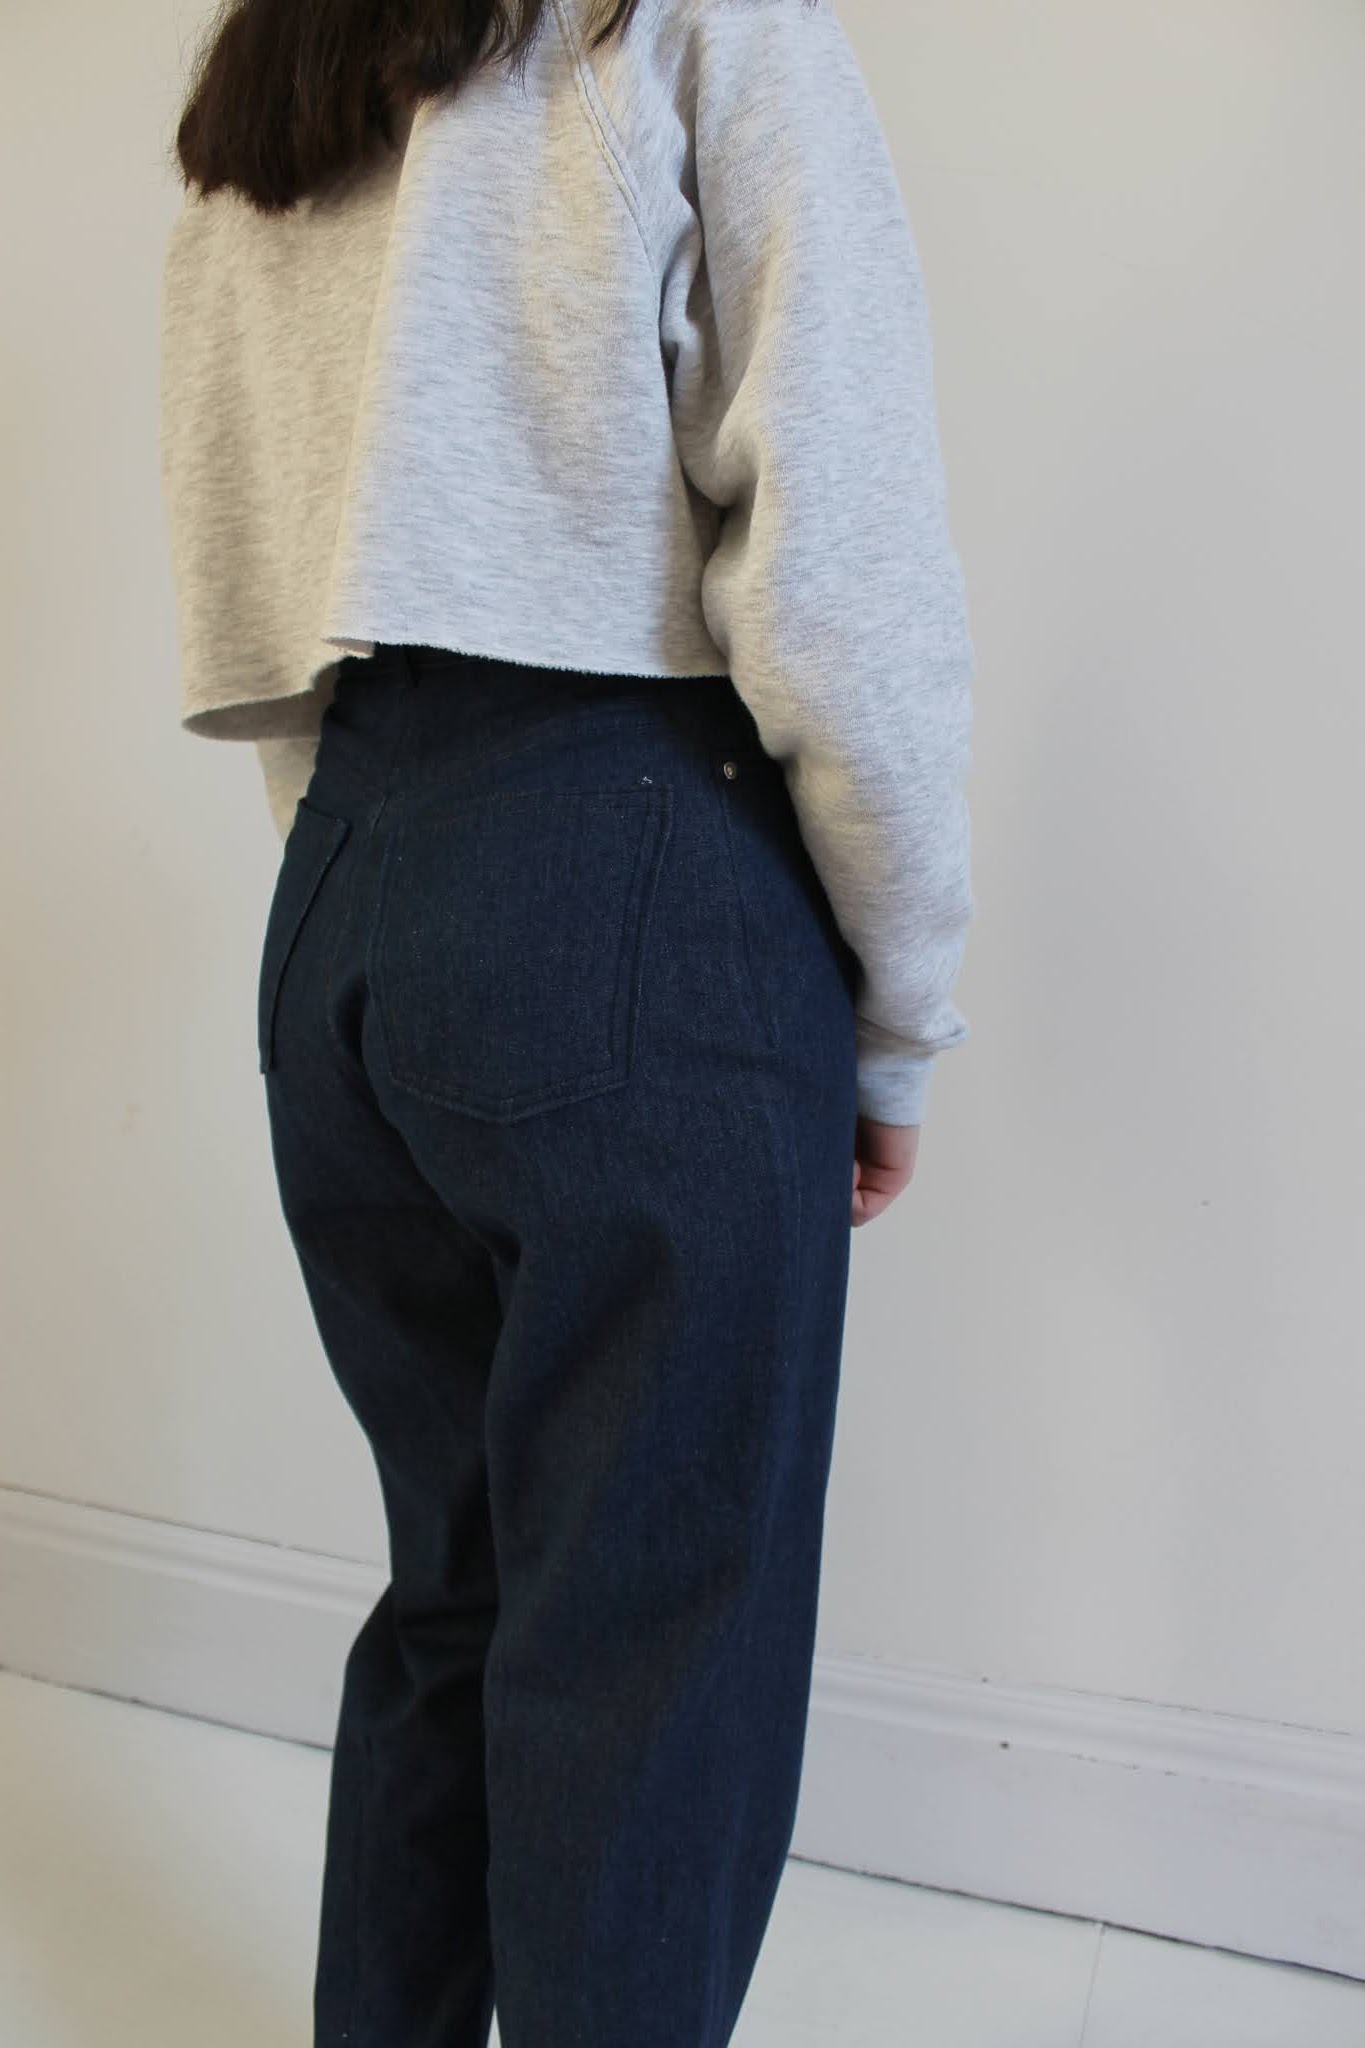
Quite a few different styles of jeans have emerged recently and I always like to use RTW clothes as sewing inspiration. One style that I kept going back to was balloon jeans, which have a fitted waist and ankle but go out in a balloon-shape before coming back in. I looked at quite a few photos online and the main technique seemed to be having darts around the base of the leg to bring the fabric in whilst keeping volume around the knee.

In order to make these jeans I cut my fabric pieces out as view C of the Dawn Jeans which are wide-legged, I made a pair of these without any hacks a few months ago. For this pair, I constructed the jeans as usual until it came to sewing the legs together, at which point I basted both the inner leg seam and the side seams in place. Then came a lot of pinning! I tried the jeans on and basically pinned the shape I wanted in place. The wide-legged jeans were quite a bit wider than what I wanted for the balloon jeans so I took quite a bit of fabric out from both the inner leg and side seams, especially around the thigh/knee area.

To get the shaping that I wanted I needed to add in some darts. Again I basted these in place so that they could easily be unpicked and re-sewn at a different length. I was expecting the darts to take ages to get right but they were surprisingly straightforward to do, I added one up the middle of the back and two in the front at equal distances from the side seams. My darts ended up being about 1" wide at the bottom and 11" long, but depending on how much fabric you want taking in at the ankles you could vary the width.

Once the darts were in place I basted the seams for a second time, following the shape that the pins made. This took quite a while to get right and I ended up taking more fabric out than I was expecting as I found that I didn't like the really baggy look that the jeans had. The great thing about making these myself is that I was able to create a pair of balloon jeans which go out in the right shape but weren't too baggy, I think I might have found a RTW pair a bit loose and harder to wear.
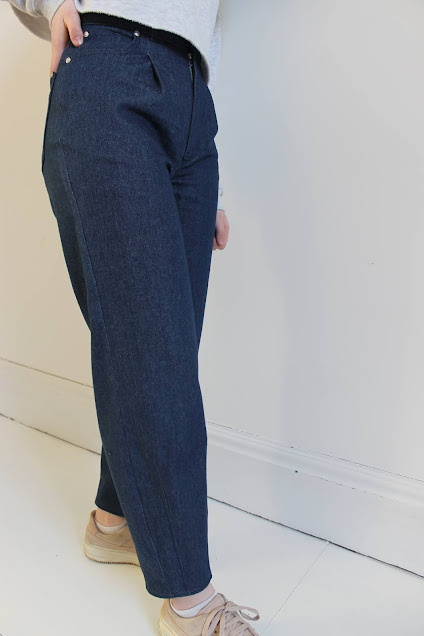
I'm very pleased with the shape that I created, like I said they don't go out too much so aren't overly baggy but the balloon shape is there and is especially visible from the side.
Because the legs are quite loose it was important to me to make sure that the waistband fit really well. It means that the jeans can be worn with a more fitted top to balance out the looser legs and I think having a pair of jeans that fits well on the waist makes them seem a bit smarter, not to mention that they're much nicer to wear if they fit.
It's taken me so long to get the fit of jeans right but I've finally got there with the Dawn Jeans. The main adjustment I made to the pattern was to remove a wedge from the centre back seam and also take the side seams in by 2cm either side at the top. I wrote more about the fitting process in this post. I'd really recommend making a jeans pattern without hacking it several times to get the fit right and to then transfer those markings to the pattern. Having the pattern already altered to fit me makes the sewing process so much more enjoyable as I don't have to think about adjusting the fit every time I make a pair of jeans, I can then focus on hacks to the leg shape instead.

As well as having darts to shape the legs, the main thing I noticed when looking at RTW balloon jeans was that they featured pleats at the waist. I did consider leaving off the pleats as I was worried about over-hacking, but they link to the more relaxed style so seemed like a necessary addition. Fortunately the denim I used was the perfect weight. I'm not sure the pleats would have worked in a thicker fabric, I didn't want them to stick out stiffly.
In the end adding the pleats was a fairly simple pattern adjustment. When cutting out the front trouser piece I marked on the pattern where I wanted the pleat to go (ideally about 1/2" away from the pocket) and then moved my pattern piece to add in an extra 2" of fabric which would then be folded to create the pleat. The proper way of doing this would be to alter the pattern but my lazy method worked fine too!
Initially, I folded and basted the pleats in place and just left them as they were. However, when I tried the trousers on the pleats seemed to get a bit lost among the other features and didn't really stand out enough. To get past this I sewed together the pleat, adding about 1" of stitching down from the waistband. It's hard to explain but this post gives you an idea of what I did, you can see from the photo that it makes the pleat stay in place at the top. The pleats remind me of these trousers that I made a few years ago and loved wearing.
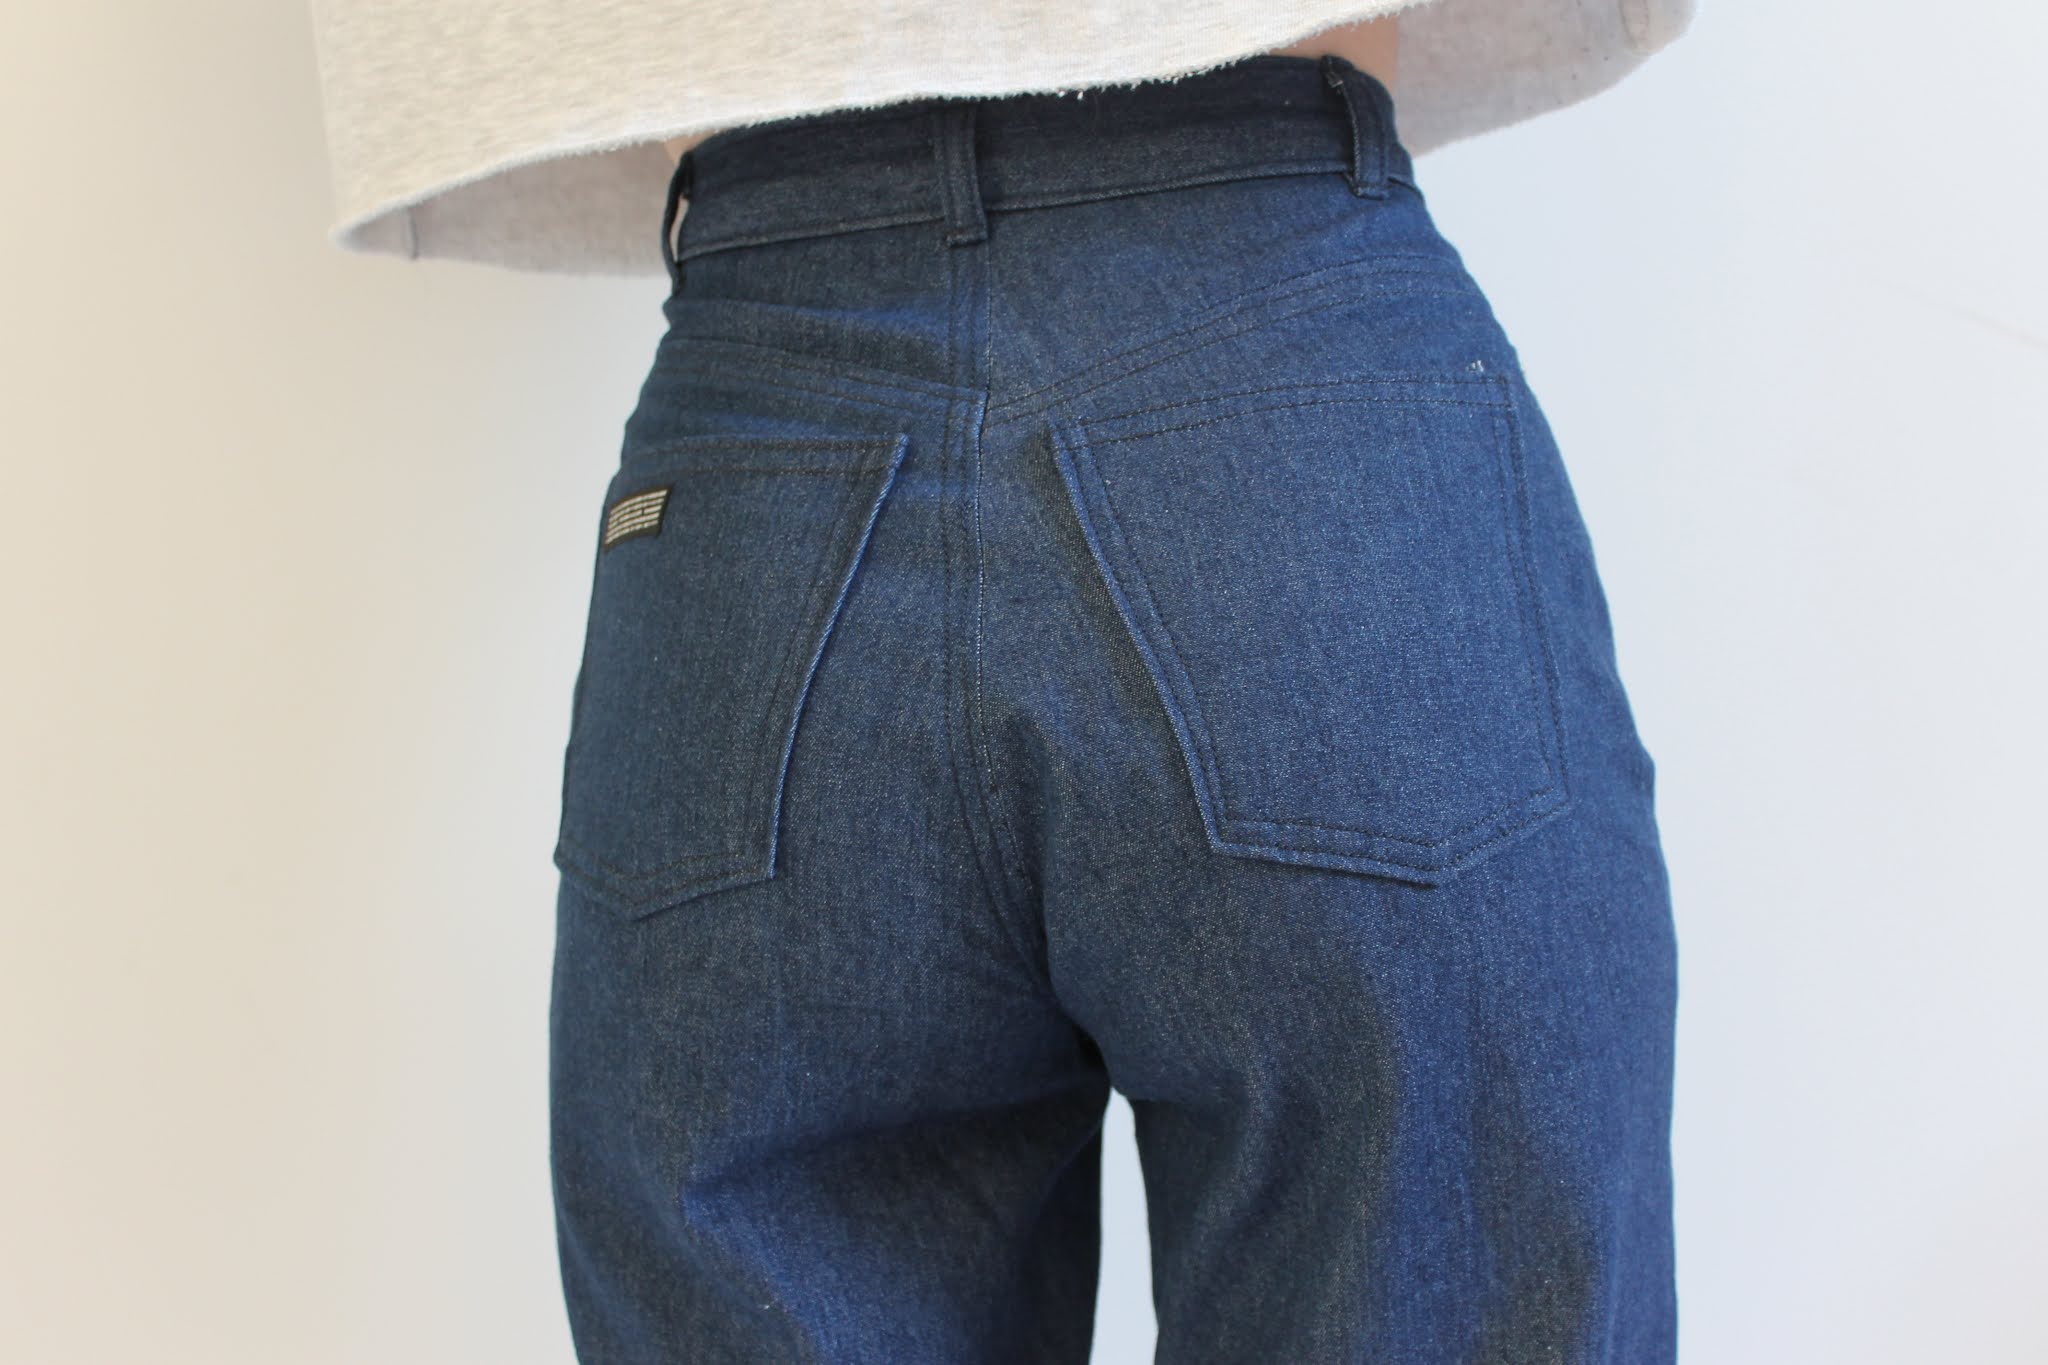
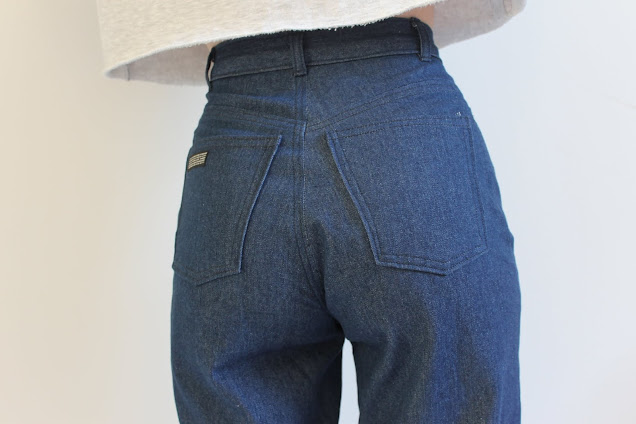
I really enjoyed adding topstitching to these jeans. I used a matching colour thread (I didn't want a contrast colour to take away from the leg shape which is the main feature) but I think that the texture of a heavyweight thread adds a lot of interest, especially around the waistband and on the back pockets.
Possibly my favourite feature was my decision to add topstitching to the darts on the leg. I wasn't planning to do this but kept thinking that it could look really cool, so I decided to go for it and I love how it looks. It makes the darts seem purposeful and ties the legs to the waist. It helps that the inseam has a double row of topstitching which I then repeated for the hem, again drawing it all together.
When it came to hemming the jeans it took me quite a while to decide what length I wanted them. I turned them up by a couple of inches to start with and really liked the slightly cropped length. However, I've noticed that the length of jeans seems to be increasing so I wanted them to be slightly longer. When I compared the two lengths I actually really liked both of them, in the end I went for the longer length but either would have been nice.
Like all handmade jeans these were only complete once I added rivets. They're surprisingly easy to add but I think they go a long way in making these look shop bought rather than handmade. I chose to go for silver rivets with this colour denim although it probably would have looked nice with bronze ones too.
Another lovely detail of handmade jeans is being able to add pocket bag lining fabric. This is always something that I like to do in a fun contrast fabric, it isn't visible from the outside but always makes me smile when I put the jeans on. I chose to use this floral cotton print from Craft Cotton Co, I think it pairs perfectly with the navy denim.
I couldn't resist adding a 'pattern hacker' label to the back pocket. I tend to add labels to the insides of makes but this one is so perfect for these jeans and it's quite subtle so isn't too much of a statement.
I'm honestly slightly surprised by how well these turned out! I had a very clear picture of what I wanted these jeans to look like in my head but it's often really hard to transfer that onto an actual garment, especially without a ready-made pattern. The time it took to baste the side seams of these jeans really paid off as the width is just right. I also love how the darts are used to bring the fabric back in at the bottom, it's a clever design feature that I like the look of too. I'm definitely going to be hacking the
Dawn Jeans again, once the fit has been perfected the possibilities are endless!