Thursday 27 September 2018

Art Gallery Frankie T-Shirt


After the success of my last Frankie t-shirt, I knew that another one would be imminent. I've made quite a few t-shirts this year and found that I didn't dislike the task of 'boring' sewing as much as I anticipated. For me, a t-shirt is a nice and speedy sew that is the perfect thing to make after a long project, when you feel in need of a satisfyingly quick sew. My green Frankie and my Paris top were probably my most worn t-shirts in summer and I decided to make another Frankie to enjoy the last few rays of September sunshine with. 


One of the nice things about re-making a pattern is that you know already that it will be a success style-wise. Rather than having to check and double check hem length I simply placed my previous t-shirt on top of this one and pinned the length according to that. I knew that I liked the slightly cropped length of my other top and that I wanted this version to have that too. The same went for sewing the side seams: I used the same seam allowance as on my other version so that it would fit the same way. All of these things meant that what was already a very quick sew became even quicker, and I had a new t-shirt in no time at all.


I was actually quite surprised at how much I enjoyed wearing a green top, which isn't a colour normally associated with my wardrobe. The fabric for this top is probably more classically what I would go for - in other words it's blue! I do love this fabric though. It's an Art Gallery jersey fabric which is really amazing quality. I also really like the pattern which is a bit different to your everyday blue and white combination. The downside to such gorgeous fabric is that it is quite expensive, but then again 1 metre was the perfect amount to make this top with.


Even though I used exactly the same pattern and sizing for both t-shirts, they are quite different mainly due to the fabric choice but also the fabric weight: the Art Gallery jersey is slightly lighter-weight meaning that it has a bit more drape. There isn't much else to say about both this top and the pattern that hasn't already been said, but to conclude I think this is a great simple make which is bound to get lots of wear. It's nice to have another tried and tested pattern to add to the list too.

Saturday 22 September 2018

Overlocker Unlocked - Overlocking Woven and Stretch Fabrics


I don't know about you, but now that I have an overlocker I can't imagine not having one. I love the finished look it gives and I just love using the machine too! It seems hard to remember a time when I didn't have an overlocker but I've only very recently started using one. Furthermore, I never really needed one. Of course, having an overlocker makes some parts of sewing a lot easier but overlocking definitely isn't a necessity. Today I thought that I'd go through the two main things I use my overlocker - finishing seams on woven fabrics and sewing stretch fabrics - and how using an overlocker has changed my approach to these things slightly.


To begin with, woven fabrics. I think that while overlocking woven fabrics can do a wonderful job at preventing them to fray, it can often be time consuming and unnecessary. Before I began using my overlocker, I would finish the seams using a zig-zag stitch after I sewed them. Instructions for woven patterns often tell you to do this and while it works fine with a sewing machine I wouldn't recommend doing it with an overlocker for several reasons. The first is that an overlocker is far less malleable than a sewing machine - you can't get it to sew in a small gap or begin and end sewing in a precise location. Overlocking takes a long time to unpick and the damages may be unrepairable if the blade slices into the fabric. A normal sewing machine is much easier to unpick and much harder to completely wreck a garment with! Because of this it can be better to revert back to a zig-zag stitch on your normal machine if the seam you need to finish is particularly intricate. 


The second reason I wouldn't recommend sewing a seam on your sewing machine and then finishing that seam with an overlocker is that it is time consuming. If you're using the same machine for the entirety of a project all you have to do is switch the dial to a zig zag stitch and you can carry on sewing in no time. With an overlocker, it's different. You have to actually switch machines. While this doesn't take all that long in theory, in practice it can take a while especially if you're having to do it continuously. For me, although I do have enough space to have two machines side by side on my sewing table at once, complications to do with plug sockets, mixing up pedals, tangling wires and having to put everything else to one side mean that it just isn't practical to do this. 
Because of all this, I find it much easier to do all overlocking in one go. It means that I can comfortably use just the one machine and it also prevents later problems of having to overlock while partway through a project. I like to overlock around the outside of each pattern piece straight after cutting the fabric and before I begin sewing. For fabrics that fray a lot it also has the knock-on effect of meaning that the fabric won't fray mid-project. 


When it comes to overlocking jersey fabrics, I like to take the opposite approach. One of the things that I LOVE about overlocking is the fact that it cuts off any extra fabric. While the blade is slightly nerve-wracking and takes a while to get used to at first, it's a feature that I love using especially on jersey. It allows for such a clean finish. Sewing with woven fabrics tends to be a lot more intricate than sewing with jersey fabrics, and because of this a stretch garment can be sewn up in absolutely no time on an overlocker. I now very rarely sew knits on a regular sewing machine and I was wondering about whether there are actually some downsides to this. 
On a whole, I think that if you can, you should absolutely sew the entirety of a jersey garment on an overlocker. The main (and possibly only) downside I could come up with to this is that you can't actually see what seam allowance you used. This may be fine if you are only using a particuar pattern once or are happy to sew with the given seam allowance but I find that I often make the seam allowance smaller or larger depending on how well the pattern fits me: it's a really easy adjustment and means that you don't have to trace out another pattern size.
On a woven garment I often measure the seam allowance that I have used on a previous make using that same pattern so that I can replicate it. But on a jersey top that has had any excess fabric cut off of the seam, I can't go back and check what seam allowance I used. While this is by no means a big problem, it can be slightly frustrating if I want to make another version of a pattern to be the same size as my previous version. I guess I should just always note down which seam allowance I used where, but somehow that never crosses my mind when I'm actually sewing!


I hope you enjoyed reading a few of my thoughts about when overlockers may in fact hinder sewing and that you may have taken a few tips away with you too. To conclude, I absolutely love using my overlocker and will definitely continue using it, I just thought it would be interesting to note a few things down!

If you'd like to read the other posts in this series, you can do so here.

Sunday 16 September 2018

Chunky Rib Charcoal Grey Dress


An easy to wear casual jersey dress is a project that I've had at the back of my mind for some time. Not the kind of project that I wanted to make immediately, more the kind of project that was waiting to be made when the perfect fabric was discovered. When I did come across this fabric, I knew immediately that it was the right one to make this dress out of and I'm so happy I waited for the right fabric rather than trying to look for it because it really is perfect! To make this dress, I used this charcoal grey chunky rib fabric from Like Sew Amazing. The photo of the fabric on their website is somewhat underwhelming, but in real life it has a gorgeous texture to it and despite being a dark colour is a really nice shade of grey. It isn't like any fabric I've sewn with before either - it's super stretchy like a normal rib is, but it's also really chunky. I'd compare it to a stretchy version of chunky needlecord, if you're able to picture that! It also looks strangely similar to carpet samples...


Despite the intrigue of the fabric it was a joy to sew with. Sewing with knits has become so much easier now that I have my overlocker! This was a super quick make as well, I love it when a garment comes together quickly. I decided to self-draft the pattern. It's pretty much the same as the one I used for my black top only I descended it into a dress. For the dress shape I used the Tilly and the Buttons Coco dress to determine where it should go in at the waist etc, but I minimised the A-line shape quite by quite a lot. As you can see by my previous version the Coco has got a striking A-line shape common with quite a few Tilly and the Buttons patterns. Personally, I'm not a fan of the shape and I much prefer the way this dress comes in rather than out.


Although not visible in the photos the neckline has got a neckband around it. I really love the look of neckbands (although I love sewing them slightly less!) I just find that on jersey they give a cleaner and more professional finish to a bias bound neckline or simply turning the fabric under and topstitching it.
I'm so pleased with this dress. I had quite a strong view of what it should look like in my mind and often the finished garment can be not quite right when you have a strong opinion to begin with, but with this dress it came out exactly how I pictured it and I love that. I expect it will be a long time until I can wear it without tights again but hopefully I'll be able to wear it thoughout the colder months too with layering.

Tuesday 11 September 2018

Pyjamas for Me


Despite having made what feels like an infinite number of pyjama shorts and trousers, what I found myself in need of this summer was a pair of pyjama shorts. The reason I appear to have made so many pairs yet ended up owning so few is due to the fact that every time I make pyjamas they seem tend to be for another person (that other person being almost exclusively my sister who owns several lovely pairs of handmade pyjama shorts!). I was wondering why this was the case and I think it's to do with the fact that while I don't mind sewing simple projects such as pyjamas for others - in fact, I enjoy it - when it comes to sewing for myself I would rather spend my sewing time making something more exciting. However, the combination of this lack of pyjama shorts and incredibly hot weather led to a pair of pyjama shorts being made for me this time, as well as the discovery that they are something that I think I will be sewing many more of!


There are a lot of obvious benefits to sewing pyjamas: you can use lovely prints that might not be every day kind of fabrics, they are really easy and quick to make, they can be made out of a variety of fabrics (cotton, jersey etc) and they make great presents. I have made three pairs of pyjama shorts for my sister (here, here, here) and she wears them all the time. The only downside to this is that every time she wears them I wish that I had a pair too! I do have my lovely liberty pyjamas to wear in the summer though and now I have these which I also love. The fabric I used is a lovely cotton print from Craft Cotton Co. I really like both the colour and the design of fabric, but the best part is definitely the quality of the cotton which feels like such a luxury to wear. As I mentioned above, I love using fabrics that I might not necessarily wear during the day and I know that this fabric will get so much more wear as pyjamas as it would as, say, a blouse.


To make these shorts I used the Margot Pyjamas pattern form Love at First Stitch. I've used the shortened version of this pattern for pretty much every version of pyjama shorts that I've made so it's nice to know that a pattern will turn out well. It's such a simple pattern so the pyjamas were sewn in no time and were finished in time to bring on holiday where they were much needed and got lots of wear.

Wednesday 5 September 2018

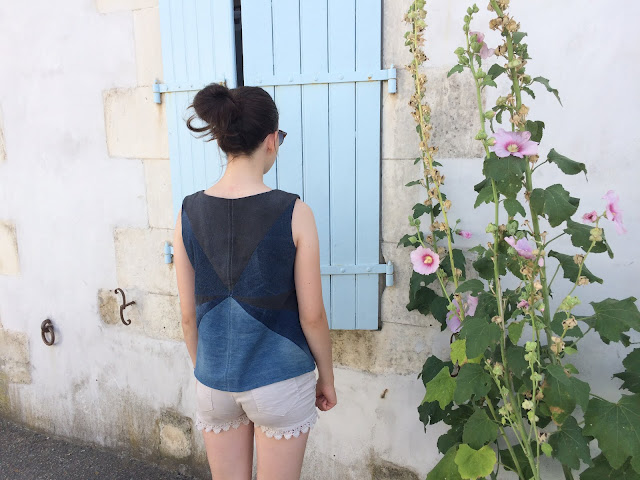
Re-fashioned Hadley Top


I know, I know, the incredibly grey end to the summer makes sunshine seem like a distant event buried deep in the past and it may seem that this top is the most seasonally inappropriate thing I could possibly talk about (although to be fair I could be posting this in December) and it probably is but... I just can't resist sharing some summer makes that I made before I went on holiday. And yes, believe it or not, when I made this and wore it it was entirely appropriate for the crazy heatwave we were having! I took these photos while I was on holiday - it was very hot and incredibly beautiful - so in a way this top is a lovely memory of my summer too.


This top is actually a re-fashion project which I find adds a lovely bit of character to a garment. I love the idea that it started off as somehting completely different and it always makes me smile to think that whenever I put it on. Having recently cleared out some old clothes, I decided to keep too-small jeans for their fabric. I love the faded look that denim gets after it's been worn for a while and old jeans are perfect for achieving this affect. I think I used the best part of 3 pairs of jeans and a pair of shorts for this top, although they were mainly children sizes and so there was less fabric. Last time I sewed a garment out of an old pair of jeans it was my button-up skirt which I love and have worn a lot and this time I decided to make a top.


I was completely inspired by this gorgeous dress by Megan Nielsen when I made this top. It was one of those projects where I absolutely didn't have it in mind and then made it almost immediately after forming the idea. One of the things that I love about this top is that the back is completely different to the front and that despite using only jean denim each denim is a different of the colour and has been worn and faded in different places.


As you can imagine there were quite a few pattern pieces for this make and I had to keep checking the formation of the pattern as the pieces fit together a bit like a jigsaw puzzle. For the pattern, I used the Grainline Studio Hadley Top which I love the shape of. The fabric is probably a bit too heavyweight for it making the top slightly more boxy, but I found that this really doens't bother me as much as I thought it would. I would really like to make another Hadley top for myself out of a drapier fabric, especially because my Mum has worn the one that I made her a lot and every time she wears it I want one for myself!
You can see how I divided the pattern piece into sections, the back is pretty similar to the front. It was surprisingly easy to do, I just sewed the pieces together to create the bodice pieces and then sewed the top as per the instructions. 


I really love this top. The colours and proportions are just right and I wore it a lot in the summer. I debated for quite a while wether or not to use contrast topstitching along the centre front and back and in the end I went for a contrast light grey and I love this addition, it reminds me of topsitching on actual jeans. Overall, this top just makes me really happy and reminds me of a lovely summer - I'm just counting down the days until it's warm enough to wear it again!