Thursday 30 September 2021

DIY Floral Viscose Midi Skirt with Split


Last year I made myself a viscose midi skirt which quickly became one of my favourite summer makes. At the time the midi-length wasn't something I'd worn before and so was a little out of my comfort zone, but the emergence of longer RTW skirts on the high street meant that I soon got used to the style. Because of how much I loved wearing the green skirt I thought I'd make another one this summer in exactly the same style but with a different fabric.


My favourite thing about viscose fabrics is the sheer number of pretty designs there are to choose from. When I first started sewing with viscose I stuck to more simple designs like this black fabric, but floral fabrics have become really popular and I wanted to make something a bit bolder. I found this orange viscose at Fabric Land on a trip intended to purchase the fabric for my jumpsuit. I thought it would be perfect to make another midi-skirt and, although I wasn't fully convinced by the orange flowers, I really liked it and decided to get a metre of it. Now that I've turned the fabric into a garment I'm really glad I bought it. There's a chance it could have been a bit much as a dress, but as a skirt which I'll pair with a white or grey top it's really fun. 


I went into more detail on how I made this skirt in this post, but in summary it's a hack of the skirt pattern that my prom dress is made from. The skirt without a bodice and made in a more casual fabric looks completely different to the dress and I'm really pleased to have made the most out of the pattern. I like to use the same pattern over and over with different hacks which can be harder to achieve when the pattern is for a special occasion, but with a bit of pattern hacking a completely different garment can be made from the same base.


This particular skirt pattern is quite loosely fitted, making it very comfortable to wear. Darts at both the back and front help to fit it well and I also added in a split on one side. When it came to my prom dress I initially hacked the skirt pattern to have two seams running up the front skirt, one sewn all the way and one with a split. To keep the viscose skirts simple (and to avoid disrupting the print) I cut them with only one seam in the front skirt which is used to create the split. 


This skirt is sewn in exactly the same way as the green one, with bias binding to finish off the top. Because this skirt pattern was intended to be joined onto a bodice to form a dress there wasn't an obvious way to finish the skirt. I could have added a waistband but with such a lightweight fabric it wouldn't have looked right. The bias binding gives the skirt a really neat finish without disrupting the pattern lines, the waist seam is simply folded over by 1/2".


I actually made this skirt a little too late into the summer to get much wear out of it this year, but I'm looking forward to rediscovering it again next year. Having enjoyed wearing the green skirt I'm glad to have another one in my wardrobe, and whilst the two have the same design I think the fabrics make them look very different.

Wednesday 22 September 2021

Handmade Grey Formal Jumpsuit


This is quite a special sewing project and I've been looking forward to taking photos of it and writing a blog post about it for a while. I don't often get the chance to sew something for a smart event but I really enjoy making formal wear. It means I get the chance to explore different sewing techniques that I wouldn't normally use and to focus on fit. Last time I made something like this was my prom dress in 2019 which is still one of my favourite and proudest makes.


I needed a few formal items of clothing to take with me to University, and so of course decided to make them. This jumpsuit is the first of those items, and it feels so fitting to be writing about it on my blog which has been a constant over the past few years. It's been a long time since I made this Coco top! Sewing has kept me grounded throughout my exams and remains an incredibly special hobby to have. I'm not sure how much dressmaking I'll be able to do next year, but I'll be able to continue wearing the clothes that I've made.


This jumpsuit wasn't actually intended from the start at all. At the beginning of summer my sister asked me to make her prom dress, and I went to Fabric Land to buy a cheap drapey fabric to use as a toile. I drafted a bodice based on what she wanted but didn't add the skirt to it as her prom was cancelled last minute. I had always planned to reuse the fabric and I really liked the bodice so decided to keep that the same. Seeing as the fabric was going to be a toile for a prom dress, it was the right weight to make a formal dress. I could have just added a gathered skirt to the bodice, but the thought of a dramatic maxi-length jumpsuit was too good not to make!


So I decided to add trousers to the bodice. I knew that I wanted them to be long and wide-legged, and I thought of the Rae Pants by Named Clothing. It's a pattern that I've wanted to make for a while and seemed to be perfect for a jumpsuit. I constructed the trousers as per the instructions but sewed the waist to the bodice rather than to a waistband. The bodice and trousers pair so well, I don't think you could tell that they weren't designed together.


The fabric I got was really cheap but it feels lovely, one of those surprisingly good Fabric Land finds! It's a viscose and drapes beautifully, something I wanted to make the most of by adding gathers to the waist seam. The trousers also have a pleats in them which work really well in this fabric.


Because my bodice was self-drafted and not intended to go with the trousers, it was really important to me that the bodice darts and trouser pleats line up to make them seem like an intentional match. My favourite detail is that the trousers lie flat between the pleats/darts and then the gathers begin after the centre panel. I think it also makes the jumpsuit smarter not to have gathers the whole way around.


I'm very proud of the jumpsuit bodice, which I self-drafted using my dress form. It always takes a while but the fit has turned out really well. Because I've used a plain fabric the darts provide interest as well as fit, and I added a centre front seam to give a similar effect. The back bodice also has two darts in it that draw it in at the waist. The risk of adding gathers was that the jumpsuit wouldn't fit so well and therefore look less smart, so having a close fitting bodice makes a big difference. The invisible zip contributes to getting a great fit and the bodice is also fully lined so the neckline and armholes are neatly finished.


The Rae Pants have a really clever design in which the slit up the centre front of each leg is hidden by the pleats. I included a slit in my prom dress too but this is such a good way to make the design a bit different. Walking in this jumpsuit feels very cool thanks to the wide legs and floaty fabric! I knew from the start that I wanted the trousers to be full length and I find it funny to think that had I made this a year ago I would have definitely made them cropped. The first long wide-legged trousers I made took a bit of getting used to but feel completely normal now. I think it's a mix of getting more confident with what I wear and changing fashion trends. 


I love this jumpsuit so much and I'm glad to have had the opportunity to make something special and different and fun! It's so strange to think that I'll be wearing it away from home, but I'm happy to be able to bring the clothes I've made with me to University. 

Tuesday 7 September 2021

DIY Square Neckline Top


As evidenced by the large number of plain t-shirts that I have sewn over the years, I’m a big fan of making wardrobe staples. I prefer using plain fabrics to prints because I know that these will get a lot of wear and they’re easy to pair with clothes that I already own. I recently made a couple of sleeveless turtleneck tops using Craft Cotton Co’s cotton jersey range and I’ve worn them so much (finally, a top that goes with more than one pair of trousers!) that I wanted to make another plain white t-shirt. I realise that most people probably don’t want to reuse exactly the same fabric immediately after completing a sewing project, but like I said I’m a fan of wardrobe staples and I’d rather make five tops from the same fabric that all get worn than five tops in different prints that I don’t like so much.

Obviously I didn’t want to make something too similar out of the same fabric, and the great thing about jersey t-shirts is the ability to make something that looks completely different with just a few tweaks to the base pattern. For example, this top looks completely different to my turtleneck one as the sleeves, hem length, looseness of fit and neckline have all been changed. 

A design that I’ve been wanting to try for a while is a square-necked t-shirt. It’s a really lovely neckline shape, probably used more commonly in woven blouses and dresses but adding it to a jersey t-shirt makes it feel more casual. I also love how it looks in a white jersey; I think it’s a t-shirt that I’ll be able to dress up or down depending on what I pair it with.


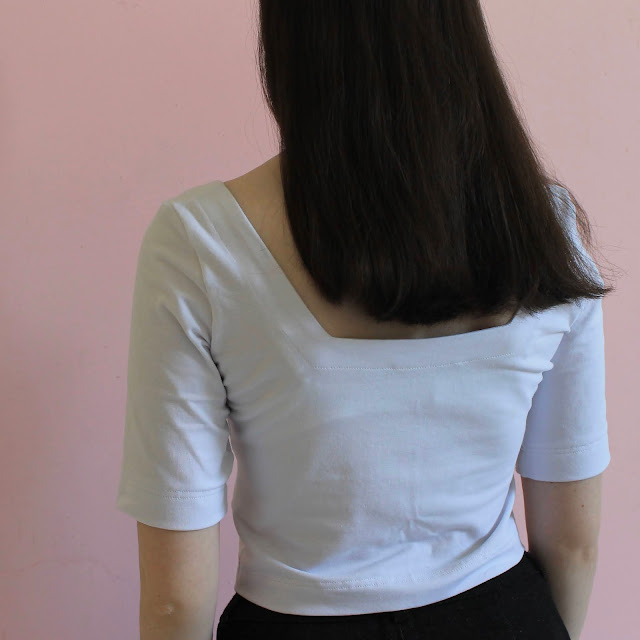
Hacking a basic t-shirt pattern into a square neckline was pretty simple. I started by measuring how far along I wanted the square to go, and also how deep. When it comes to hacking a pattern like this I’d always recommend taking out less fabric rather than more, you can always make the square cut out larger but the reverse isn’t possible! I’m pretty pleased with the depth of the square that I ended up with and I like the slight trapezoid shape of the bodice, meaning that the angle is obtuse rather than a sharp right angle up to the shoulder. The only thing that I would change next time is that I made the neckline a bit too wide at the shoulder and the sleeve slips down slightly from time to time, although it isn’t a massive problem.


After cutting out my bodice pieces I also drafted a 1.5” deep facing which I sewed around the neckline and flipped to the inside. I then topstitched around the neckline to secure the facing, leaving a deep hem that I really like the look of and taking care to keep the stitches neat around the corners.


I initially wasn’t sure what the back of this top should look like, but decided to copy the front and make this bit square too. It actually goes down a bit deeper than the front, and I think a nice alternative could be to have a high front neckline with a square cut-out only at the back.


I tend to always finish sleeves in the same way but for this top I chose to make them a bit longer than usual, ending them just above the elbow. It’s a good way to balance out the lower neckline, and I think it also makes the top a bit smarter. I left a 1.5” hem on the sleeves and on the bottom to mimic the neckline, the kind of detail that to me really finishes a top. I actually made this top a few months ago so I can honestly say that it’s been worn a lot. I’m wearing it here with my black Lander Pants, but I also really like it paired with my balloon jeans.