Sunday 26 April 2020

Tilly and the Buttons ‘Love your nails’ Jersey Top


When Tilly and the Buttons announced that they were releasing a line of cotton jersey fabrics with Craft Cotton Co, I was immediately looking forward to sewing with them. With 8 designs to choose from, they are a lovely quality organic jersey fabric perfect for sewing jersey tops. I love sewing with jersey so for me this was the perfect collaboration!


My first TATB jersey make is with the handprint design called 'Love your nails'. It's a really fun design, my favourite part is that the colours of the nails match the colour schemes of the other fabrics! I don't tend to sew with designs like this one but it was nice to make something a bit different. Because the print is the main feature of this design I like that it has a simple black background so it isn't too overpowering. 


Because the top is so simple I did want to add something a bit more interesting to the hem. A lettuce hem is my favourite finish for jersey tops and worked really well on this one. The only thing that annoys me is that the wrong side of this fabric is white and this does show slightly with the lettuce hem. It's not really a big problem but it is something to bear in mind. 


This top was a really fun and simple make. It's not the kind of fabric that I would usually sew with but I really like it. I'm looking forward to making some more things out of the TATB jerseys, they're a really lovely line of fabrics.

You can read more about this top over on the Craft Cotton Co blog.

Saturday 18 April 2020

Scrapbusting! Handmade Cami Top


I try not to have too large a fabric stash, a goal which is fairly easy for me to achieve given that I rarely buy fabric online and am only able to visit fabric shops a few times a year. There are of course exceptions to this, I do sometimes visit my local Fabricland with a specific fabric in mind and I'm lucky to receive fabric from companies in exchange for blog posts. In general though, my fabric purchases are made infrequently but in bulk - my most recent fabric buying trip being in Tokyo last summer. I like to do this to be able to really make the most of visiting fabric shops in other countries (I always plan my holiday around fabric shops, much to my family's irritation!).
However, my fabric stash is very much present nonetheless and what annoys me the most about it is that many of the fabrics are offcuts from previous projects. You know those pieces that are too small to do anything with but too big to throw away? The bane of my sewing life!


I know that there are lots of ways to scrapbust, quilting being the most obvious, but because my sewing mainly consists of dressmaking most of these scraps are jersey which are pretty much impossible to make anything out of as they can't be sewn together to create a patchwork. I love upcycling (this top was made of old pairs of jeans) so I'm always trying to find ways of using those last scraps of fabric.  Recently, I've drafted myself a strappy top pattern for making out of the smallest pieces of leftover fabric.


I'm super pleased with this top, it's made from literally nothing! The pattern is a really simple cami design with a v-neck. I finished the entire thing with bias binding which gives a lovely neat finish and doesn't use as much fabric as a facing. Because I had so little fabric I added in trapezium side panels (much like the ones I added in to my Minttu Swing Top) which make the top wide enough. They were perfect for this project as my leftover fabric was in bits a pieces rather than one continuous piece. I love how the side panels make the top swing too.


You might have recognised the fabric that this top is made from. It's the beautiful viscose fabric that my friend bought for me in India, initially used to make a pair of Marigold Trousers. Although I'm glad to have made the trousers I kind of wish I'd saved the fabric, I'd really like to try and make a midi skirt at some point and it would have been perfect for that. I don't often buy viscose fabrics, they're something I'm on the lookout for at the moment. 
Like I said there was hardly any of this fabric leftover so I'm really pleased I managed to make a top out of it! It's definitely not warm enough for me to wear it at the moment but I'm hoping it will be lovely in the summer. I like that the simplicity of the top shows off the fabric too. If you look closely you might notice the centre back seam. This wasn't intentional but I found it was necessary from the absolute lack of fabric. I think it looks quite nice though, it's neatly stitched down and doesn't break up the pattern too much.


I used to really hate bias binding, I found it was never quite neat enough, but I've come to really love it now. It was certainly the perfect finish for this project, I even added it round the bottom hem to keep every last bit of length! The fabric was well and truly used up and I feel suitably satisfied.

Friday 10 April 2020

Zip-Neck Tilly and the Buttons Freya Top


There is something so wonderful when a make turns out exactly as planned and I'm thrilled with my new top. I've had this planned for a really long time but wanted to wait for the right moment to make it. The main downside to planning something for so long is the self-imposed pressure to get it right, so I took my time with the sewing. I wanted it to look shop bought and I think it really does but with all the bonuses of being handmade - being able to decide the fit, colour, fabric etc. I just love it!


This was a special project for me because it was made with one of my beloved Tomato fabrics from Tokyo. I've been trying to use the fabrics on things that I will wear a lot and really love, they're just all so gorgeous and I can't buy anymore of them. Those goals have certainly been achieved with my checked Anima Pants and grey Linden Jumper which I wear literally all the time. The thing is, even though I waited a while before using this fabric my plan for it hasn't changed since I bought it. As soon as I saw the circle zip-pull zips I knew I wanted to make a top like this and of course the shop also had the perfect fabric. The fabric in question is a fairly heavy weight rib in this stunning orange/red colour. It's quite a bright but I love it and it goes so well with the grey and white zip. I didn't need to interface the fabric as it was heavy enough to sew the zip straight in. The zip did go in fairly seamlessly but I took my time over it and definitely woudn't like to sew a zip into a light weight jersey. The scariest bit is having to cut down the centre front seam - I was so worried I'd cut too far!


I think I mentioned in my post about my zip-neck jumper that I was planning another top with a zip and this one has been in the plans long before I bought the fabric for the pink jumper. Out of all the styles of zip tops I've seen on the highstreet, the fitted turtleneck with a zip that goes partly down is my absolute favourite. I was initially worried about recreating it because an open zip is just so difficult to get lying flat but decided to risk it anyway. The risk really paid off and I'm thrilled with the insertion of the zip, it's hardly bumpy at all at the end and lies completely flat unlike the other jumper. It's great to have been able to build on that skill and means that I can make many more of these tops (because of course I want to make more!). It helps that this zip from Tomato is just gorgeous, I wish I had bought more as I'm not sure they sell the same thing here.


Like I said there are quite a few variations of the same thing avaliable but I've always liked fitted long sleeved tops (I love wearing this one) and as a bonus I thought it would be perfect for hacking the Tilly and the Buttons Freya top. I often use the Freya top pattern as a base for simple t-shirts but usually leave off the neckband. However, for this hack I stayed much closer to the original pattern. In order to add in the zip, I cut the front bodice at a slight angle on the fabric so that the 'place on fold' edge wasn't lying up with the fold at the top of the pattern. This left a tiny triangle of extra fabric going from about 1cm extra at the top end of the centre front to nothing by the hem. I'm not sure if that's really very clear (sorry if not!) but it essentially gave me more fabric at the top for the seam allowance of the zip without making the front bodice wider at the bottom. I also added about 1cm to the neckband but that wasn't really necessary considering how stretchy the rib fabric is.
The zip insertion obviously changed my construction of the neckband and luckily it all went really smoothly, although there were a couple of moments where I held my breath! I was initially going to topstitch around the zip and also topstitch the neckband down but decided against it as it would have forced the fabric to sit in a particular way. I'm glad I didn't, it looks less strict without the topstitching.


When it came to hemming the top I simply cut along the bottom with my rotary cutter. It gave it a nice smooth edge and as the rib shouldn't fray it worked perfefctly. In general I don't like leaving things unhemmed as the thought of fraying always nags at me, but I tested a few scraps and it seemed to be fine. I tend to finish jersey makes with a lettuce hem but didn't want to take the attention away for the zip on this top. Turning up the fabric and hemming also wouldn't have worked as the rib is too heavy weight and there would have been an uncomfortable-looking bulge where the hem was. With a loud colour and fairly loud design feature, the simple clean finish means there isn't too much going on.
Ah isn't it so lovely to have a new make! I feel like this ticks all the boxes: new skill, a design I love and a special fabric.

Sunday 5 April 2020

Sewing through COVID-19: Handmade Scrubs!


In this completely bizarre period of time, it's nice to hang on to constants and for me one constant is sewing. Having to stay at home is certainly much more bearable with a hobby, and it's even better when that hobby can be put to good use. My mum asked me to make her a couple of scrub tops to wear to work (she usually wears normal clothes) and I have to admit to being slightly reluctant at first (sometimes you just want to sew something for yourself!) but I'm really glad to have made them, especially as she's been wearing them everyday since. 


I should start by saying that this top was actually my second attempt. My mum and I tried to make a patten for the first top together, using a large t-shirt as a base. While the attempt wasn't bad, I made it with ongrown arms rather than having a separate pattern piece for the sleeves so shoulder movement is restricted. The first top also lacks the classic overlapping v-neckband of scrubs and instead has just a v-shaped neckhole with the fabric turned under and topstitched. The next day I used a borrowed pair of actual scrubs to create a pattern which I then used to make this top, a much better outcome. The first one isn't wasted though as she needs two and it's still wearable.


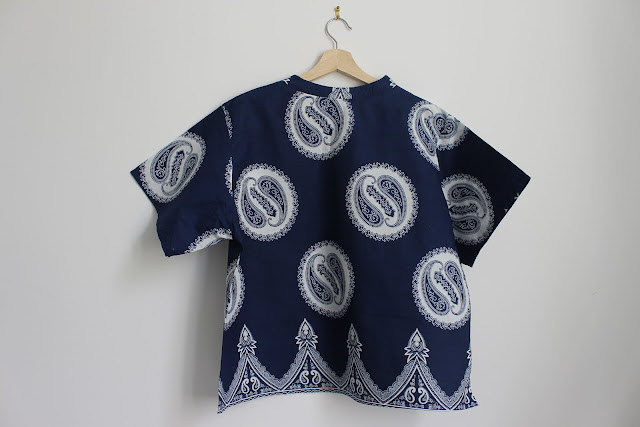
The problem with the request to make two scrub tops was that they require quite a lot of cotton fabric and obviously I wasn't able to pop out and buy some. We managed to find a large piece of this waxed cotton print in my fabric stash which ended up being just enough fabric. My mum was given this as a present a couple of years ago by a friend from Malawi and whilst it felt slightly too far out of my comfort zone to make into an everyday item of clothing, it was perfect for a scrub top. She's bought some navy scrub trousers to go with the top and the overall look is pretty cool! It's fun to have something a bit different to the classic plain scrubs too.


Scrubs are a very easy design and the two tops were really quick to sew. The hardest part was definitely the neckband, to me it's part of the iconic scrub look (if that's really a thing?!) and so I was determined to make the v-neck as precise as possible. I think it turned out rather well! I had to make up the technique as I went along as I didn't have any instructions but I'm very happy with how it looks.


A final detail to make the top look a bit more professional was to add a small slit in the side, this was something that the top that I copied had. The only thing I didn't do was add pockets as Mum thought they wouldn't be necessary, although I think she has since mentioned that they'd be useful so I might go back and add a large pocket to the front.


This was a really satisfying make. It was fun to learn a new skill and make something quite different to what I've ever made before, and it's nice to know that this really useful and will be worn a lot in the immediate future. I couldn't resist adding the stethoscope to the photos on my Adjustoform - it just completes the look!